Tartube - The Easy Way To Download and Watch Videos
Works with YouTube, Twitch, Odysee, and hundreds of other sites
Download Tartube from trustworthy websites - not fake ones!
1 Introduction
Tartube is a GUI front-end for youtube-dl, yt-dlp and other compatible video downloaders.
It is written in Python 3 / Gtk 3 and runs on MS Windows, Linux, BSD and MacOS.
Problems can be reported at our GitHub page.
2 Why should I use Tartube?
You can fetch a list of videos from your favourite channels on YouTube, Twitch, Odysee and hundreds of other sites (see here or here for a full list)
If buffering is an issue, you can download a temporary copy of a video before automatically opening it in your favourite media player
Tartube will organise your videos into convenient folders (if that's what you want)
Tartube can alert you when livestreams and debut videos are starting (works on YouTube, Twitch and Odysee by default)
If creators upload their videos to more than one website (YouTube and BitChute, for example), Tartube can interact with both sites without creating duplicates
Certain sites operate an "only one opinion allowed" policy. If you think that the censors will remove a video, against the wishes of its creators and before you've had a chance to watch it, Tartube can make an archive copy
Certain sites manipulate search results, repeatedly unsubscribe people from their favourite channels and/or deliberately conceal videos that they don't like. Tartube won't do any of those things
If you want to listen to your favourite discussion videos, for example while driving a car, Tartube can make an archive copy of just the audio, rather than the full video
Tartube is free and open-source software
3 Downloads
Stable release: v2.5.231 (24 May 2026)
Development release: v2.5.231 (24 May 2026)
Official packages (also available from the Github release page):
MS Windows (64-bit) installer, MS Windows (64-bit) and FFmpeg installer and portable edition from Sourceforge
Tartube is no longer supported on older versions of MS Windows - see 7.24 Doesn't work on 32-bit Windows / Windows 7 / Windows 8
DEB package (for Debian-based distros, e.g. Ubuntu, Linux Mint) from Sourceforge
RPM package (for RHEL-based distros, e.g. Fedora) from Sourceforge
Official 'Strict' packages:
Alternative DEB/RPM packages are marked STRICT. In these packages, updates to youtube-dl from within Tartube have been disabled. If Tartube is to be uploaded to a repository with lots of rules, such as the official Debian repository, then you should probably use the STRICT packages.
Semi-official packages (MS Windows):
Semi-official packages (Linux):
Source code:
Source code from Sourceforge
Source code and support from GitHub
In case this Github repository is taken down, there is an official backup here
4 Quick start guide
Install Tartube, using any of the methods described below
Start Tartube. A setup window should appear
When prompted, choose a folder in which Tartube can store videos
When prompted, choose a downloader
On some systems, you will be prompted to install the downloader and/or FFmpeg. On other systems, you will have to install them yourself
Tartube can store its videos in a database. If that's what you want, then do this:
Go to a video website, and find your favourite channel
In Tartube's main window, click the Add a new channel button (or from the menu, click Media > Add channel... )
In the dialogue window, add the name of the channel and its URL (link)
Click the OK button to close the window
Click the Check all button. Tartube will fetch a list of videos in the channel
Click All Videos to see that list
If you want to download the videos, click the Download all button
If you just want to download videos with a minimum of fuss, do this:
Go to a video website, and find your favourite channel
In Tartube's main window, click the Classic Mode tab
Copy the URL (link) to the channel into the box at the top of tab
Just below that, click the button to select a download destination and a video/audio format
Click the Add URLs button
When you're ready, click the Download all button
5 Installation
5.1 Installation - MS Windows
MS Windows users should use the installer available at the Tartube website. The installer contains everything you need to run Tartube.
There is also a portable edition; use this if you want to install Tartube onto removable media, such as a USB drive. Download the ZIP file, extract it, and run the file tartube_portable_64bit.bat.
Both the installer and the portable edition include vital dependencies like AtomicParsley and Deno, so there is no need to install them yourself.
Tartube is no longer supported on older versions of MS Windows - see 7.24 Doesn't work on 32-bit Windows / Windows 7 / Windows 8.
5.1.1 Manual installation - MS Windows
If you want to perform a manual installation, you can follow this procedure, which will take about 10-30 minutes, depending on your network speed.
Download and install MSYS2 from msys2.org. You need the file that looks something like msys2-x86_64-yyyymmdd.exe
MSYS2 wants to install in C:\msys64, so do that
Open the MINGW64 terminal, which is C:\msys64\mingw64.exe
In the MINGW64 terminal, type:
pacman -Syu
If the terminal wants to shut down, close it, and then restart it
Now type the following commands, one by one:
pacman -Su
pacman -S mingw-w64-x86_64-python3
pacman -S mingw-w64-x86_64-python-pip
pacman -S mingw-w64-x86_64-python-gobject
pacman -S mingw-w64-x86_64-python-requests
pacman -S mingw-w64-x86_64-gtk3
pacman -S mingw-w64-x86_64-gsettings-desktop-schemas
Install Microsoft Visual C++ (a free download from the Microsoft website)
Navigate to the folder C:\Windows\System32
Copy all the files whose name starts with msvcr (e.g. msvcr120_clr0400.dll) into the folder C:\msys64\mingw64\bin
In the MINGW64 terminal, type the following commands:
/mingw64/bin/python3 -m venv ~/ytdl-venv
source ~/ytdl-venv/bin/activate
In a suitable text editor, open the file C:\msys64\home\YOURNAME\.bashrc
At the top of the file, add the following lines, then save it
export PIP_HOME="$HOME/.local/pip"
export PIP_BIN_DIR="$HOME/.local/bin"
export PATH="$PIP_BIN_DIR:$PATH"
Nagivate to C:\msys64\mingw64\lib\python3.12\site-packages
Copy the following folders to C:\msys64\home\YOURNAME\ytdl-venv\lib\python3.12\site-packages
certifi
charset_normalizer
gi
idna
requests
urllib3
If you want to install Atomic Parsley, copy the MS Windows executable into the C:\msys64\usr\bin folder
The following dependencies are optional. If you decide to install them, then type these commands into a new MINGW64 terminal
C:/msys64/home/YOURNAME/ytdl-venv/bin/python3.exe -m pip install playsound3 feedparser
pacman -S mingw-w64-x86_64-aria2
If you want to install dark themes, then download and extract the file. Creae the folder
../mingw64/share/themes/Windows10/gtk-3.0/
...and copy into it the contents of the extract folder gtk-3.20
Install Deno, which is now a requirement for YouTube downloads. Download the file deno-x86_64-pc-windows-msvc.zip from the Deno releases page. Extract the file, and move deno.exe to C:\msys64\home\YOURNAME\ytdl-venv/bin
Download the Tartube source code from Sourceforge, using the links above
Extract it into the folder C:\msys64\home\YOURNAME, creating a folder called C:\msys64\home\YOURNAME\tartube
You're now ready to start Tartube
The simplest way to start Tartube is to double-click the tartube_64bit.bat file
Otherwise, you can start Tartube from the MINGW64 terminal. If you have closed the terminal at any time since you started the manual installation, you first need to open it, and type this again:
source ~/ytdl-venv/bin/activate
Then type these commands in the MINGW64 terminal (don't forget to use forward slashes):
cd /home/YOURNAME/tartube
python3 -X utf8 tartube/tartube
The -X utf8 part enables Tartube to handle non-European alphabets (such as Japanese and Korean) correctly. If that is not a concern, then Tartube could be started like this:
python3 tartube/tartube
5.2 Installation - MacOS
Tartube can be installed on MacOS, but it's not a one-click operation.
Here are installation guides for new computers with Apple silicon, all other MacOS computers, and a troubleshooting section.
5.2.1 Installation - MacOS (Apple silicon)
With thanks to m3lab-zzl:
Install Python 3 with homebrew
brew install cairo pkg-config python
Set up the python virtual environment
python3 -m venv ~/.my-venv
source ~/.my-venv/bin/activate
Install Gtk 3
pip3 install pycairo
brew install gobject-introspection gtk+3
Install Python Requests module, and either youtube-dl or yt-dlp
pip3 install requests youtube-dl
pip3 install requests yt-dlp
Install the Adwaita theme for icons used by Tartube (optional)
brew install adwaita-icon-theme
It is strongly recommended that you install FFmpeg, too
brew install ffmpeg
Deno is now required for all YouTube downloads. Install it using these instructions
Install Tartube
pip3 install tartube
Now run Tartube
tartube
When you run Tartube in the future, you must type both of these commands
source ~/.my-venv/bin/activate
tartube
5.2.2 Installation - MacOS (other computers)
With thanks to JeremyShih:
Install Python 3 by downloading an installer, or with homebrew
brew install pkg-config
brew install python
Set up the python virtual environment
python3 -m venv ~/.my-venv
source ~/.my-venv/bin/activate
Install Gtk 3
pip3 install pycairo
brew install gobject-introspection
python3 -m pip install PyGObject
brew install gtk+3
Install Python Requests module
pip3 install requests
Install either youtube-dl or yt-dlp
pip3 install youtube-dl
pip3 install yt-dlp
Install the Adwaita theme for icons used by Tartube (optional)
brew install adwaita-icon-theme
It is strongly recommended that you install FFmpeg, too
brew install ffmpeg
Deno is now required for all YouTube downloads. Install it using these instructions
Install Tartube
pip3 install tartube
Now run Tartube
tartube
When you run Tartube in the future, you must type both of these commands
source ~/.my-venv/bin/activate
tartube
5.2.3 Troubleshooting on MacOS
If you can't start Tartube from a terminal window (the final step in the procedures above), try these commands (with thanks to inkhalistan):
echo "export PATH="python3 -m site --user-base/bin:$PATH"" >> ~/.zprofile
source ~/.zprofile
tartube
If you see a gi module not found error, there are two possible solutions.
First, try typing this
pip3 install PyGObject
If that does not work, try the following procedure.
Get homebrew's location
which brew
For example if the command above returned ** /opt/homebrew/bin/brew**, then change directory by typing this
cd /opt/homebrew
Now find the gi package location
find . -name "gi"
Add that location to the PYTHONPATH variable, for example by adding this line to your ~/.zshrc file
export PYTHONPATH=/opt/homebrew/lib/python3.9/site-packages:$PYTHONPATH
You may need to tell Tartube, where to find FFmpeg. Once you have finished the setup process, do this:
Click Edit > System preferences...
If the Show advanced preferences button is visible, click it
Now click the Downloaders > FFmpeg / AVConv tab
Next to Path to the FFmpeg executable, click the Set button
Select the FFmpeg executable. Some MacOS users report that the correct path is /opt/homebrew/bin/ffmpeg
5.3 Installation - Linux/BSD
Linux/BSD users can use any of the following installation methods.
5.3.1 Install using the DEB package
Linux distributions based on Debian, such as Ubuntu and Linux Mint, can install Tartube using the DEB package (see the links above).
Tartube requires either youtube-dl or yt-dlp. If it's already installed on your system, then you can start Tartube immediately. Otherwise, do this:
Run Tartube
Tartube asks you to choose a data directory, so do that
Click Operations > Update youtube-dl
It is strongly recommended that you install FFmpeg, too. On most Debian-based systems, you can open a terminal window and run this command:
sudo apt-get install ffmpeg
5.3.2 Install using the RPM package
Linux distributions based on RHEL, such as Fedora, can install Tartube using the RPM package (see the links above).
Tartube requires either youtube-dl or yt-dlp. If it's already installed on your system, then you can start Tartube immediately.
Otherwise, if pip is already installed on your system, do this:
Run Tartube
Tartube asks you to choose a data directory, so do that
Click Operations > Update youtube-dl
If neither youtube-dl nor pip are installed on your system, then the recommended way to install youtube-dl is from the command line, using pip. (Software managers usually don't offer the most recent version of youtube-dl.)
On Fedora, the procedure is:
Open a terminal window
Type: sudo dnf -y install python3-pip
Type: pip3 install youtube-dl or pip3 install yt-dlp
You can now run Tartube.
It is strongly recommended that you install FFmpeg, too. On most RHEL-based systems (for example, Fedora 29-32), you can open a terminal window and run these commands:
sudo dnf -y install https://download1.rpmfusion.org/free/fedora/rpmfusion-free-release-$(rpm -E %fedora).noarch.rpm
sudo dnf -y install https://download1.rpmfusion.org/nonfree/fedora/rpmfusion-nonfree-release-$(rpm -E %fedora).noarch.rpm
sudo apt-get install ffmpeg
5.3.3 Install using the AUR package
On Arch-based systems. such as Manjaro, Tartube can be installed using the semi-official AUR package. The procedure is:
Open a terminal window
Type: git clone https://aur.archlinux.org/tartube.git
Type: cd tartube
Type: makepkg -si
You can now run Tartube.
It is strongly recommended that you install FFmpeg, too. On most Arch-based systems, you can open a terminal window and run this command:
sudo pacman -S ffmpeg
5.3.4 Install using the ebuild package
On Gentoo-based systems, Tartube can be installed using the semi-official ebuild package, using the link above.
Tartube requires youtube-dl. It is strongly recommended that you install FFmpeg, too.
If you're not sure how to install using ebuild, then it might be easier to install from PyPI.
5.3.5 Install using PyPI
Tartube can be installed from PyPI with or without root privileges.
Here is the procedure for Debian-based distributions, like Ubuntu and Linux Mint. The procedure on other distributions is probably very similar.
5.3.6 Install using PyPI (with root privileges)
Make sure youtube-dl has been completely removed from your system
Type: sudo apt install python3-pip
...but on Fedora, type: sudo dnf -y install python3-pip
Type: sudo pip3 install youtube-dl tartube, or type sudo pip3 install yt-dlp tartube
Type: tartube
5.3.7 Install using PyPI (without root privileges)
Type: sudo apt install python3-pip
...but on Fedora, type: sudo dnf -y install python3-pip
Type: pip3 install tartube
The Tartube executable is stored in ~/.local/bin by default. If that is already in your path, you can start Tartube by typing tartube. Otherwise, type ~/.local/bin/tartube
Tartube asks you to choose a data directory, so do that
In the Tartube main window, click Edit > System preferences... > youtube-dl
In the box marked Path to youtube-dl executable, select Use PyPI path (~/.local/bin/youtube-dl)
Click OK to close the dialogue window
Click Operations > Update youtube-dl
Once the update has finished, Tartube is ready for use
5.3.8 Manual installation
For any other method of installation on Linux/BSD, the following dependencies are required:
Either youtube-dl or yt-dlp
These dependencies are optional, but recommended:
Python pip - keeping youtube-dl up to date is much simpler when pip is installed
Python feedparser module - enables Tartube to detect livestreams
Python moviepy module - if the website doesn't tell Tartube about the length of its videos, moviepy can work it out
Python playsound3 module - enables Tartube to play an alarm when a livestream starts
FFmpeg - required for various video post-processing tasks; see the section below if you want to use FFmpeg
Deno - required for all YouTube downloads
AtomicParsley - required for embedding thumbnails in audio files
aria2 - provides an external downloader for youtube-dl
matplotlib - required for drawing graphs
streamlink - can be used to download livestreams
5.3.9 Install from source
After installing dependencies (see above):
Download and extract the source code (see the links above)
Change directory into the Tartube directory
Type: python3 setup.py install
Type: tartube
5.3.10 Run without installing
After installing dependencies (see above):
Download and extract the source code (see the links above)
Change directory into the Tartube directory
Type: python3 tartube/tartube
5.4 Packaging Tartube
Tartube packages are usually created using one of the available environment variables:
TARTUBE_PKG for packages without restrictions
TARTUBE_PKG_STRICT for a package which should not download or update youtube-dl or FFmpeg; the user is required to install those packages separately
TARTUBE_PKG_NO_DOWNLOAD for a package which should not download any videos (and also will not download/update youtube-dl or FFmpeg)
Some packaging systems might forbid installing other packages. If that's the case, you can use TARTUBE_PKG_STRICT or TARTUBE_PKG_NO_DOWNLOAD.
Anyone with concerns over the legality of downloading videos can disable that feature altogether. Tartube will still be able to check videos, channels and playlists, as well as monitor livestreams. Users can watch a video on its original website with a single click. The authors understand that the US courts have ruled that 'scraping' a website is legal. Popular sites like YouTube provide RSS feeds for this very purpose.
Packages can be created in the standard way. For example, an RPM package would be created with the command:
TARTUBE_PKG=1 python3 setup.py bdist_rpm
5.4.1 Packaging Tartube on MS Windows
The procedure used to create the MS Windows installer is described in full in the installer script itself.
6 Using Tartube
6.1 Setting up Tartube
When you first start Tartube, you will be asked to choose a few settings.
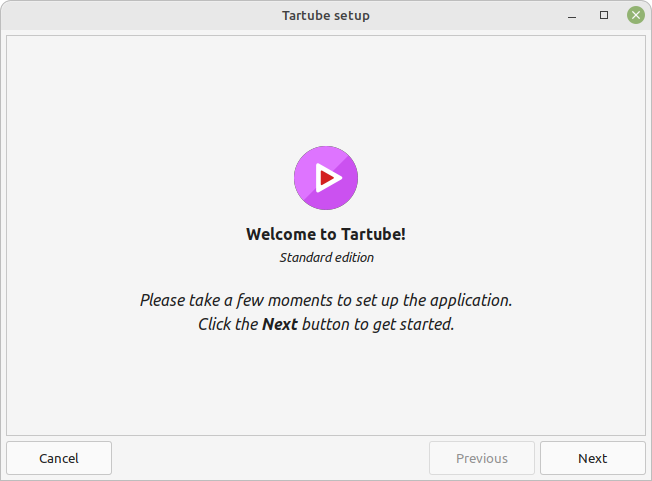
Most users can use this window to download and install some packages. If not, those packages must be installed separately.
All of these settings can be changed later, if you want. For example, to change where Tartube stores its files, see 6.21 Managing databases.
6.2 Updating the downloader
If you installed Tartube via a repository such as the official Debian repository, then Tartube may not be allowed to update youtube-dl. In that case, this section does not apply; update youtube-dl using your system's package manager.
Tartube uses a downloader to interact with websites like YouTube. Tartube officially supports two downloaders, youtube-dl and yt-dlp. (Other forks of youtube-dl will probably work as well.)
Websites changes their code frequently, and therefore the downloaders must be updated frequently.
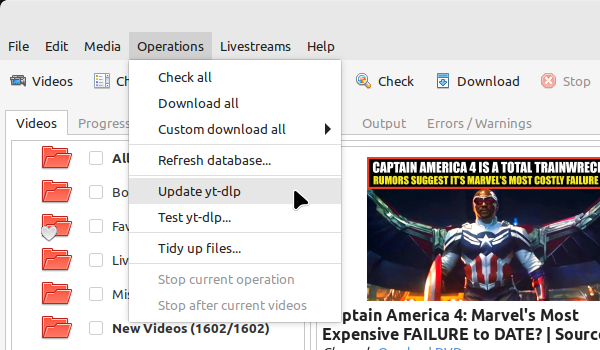
Click Operations > Update youtube-dl
The name will be different if you're using a different downloader
6.3 Setting the downloader's location
If the update operation fails on MS Windows, you should ask the authors for help.
On other systems, users can customise the downloader's location. There are several locations on your filesystem where youtube-dl might have been installed.

Click Edit > System preferences... > Downloaders > File paths
Try changing the setting Path to executable
Try changing the setting Command for update operations
Try the update operation again
6.4 Installing FFmpeg / AVConv
FFmpeg and AVConv are commonly use for various video-processing tasks.
It is strongly recommended that all users install FFmpeg. Without it, Tartube won't be able to do any of these things:
Display thumbnails from YouTube
Download high-resolution videos from any website
Download some video formats
Convert video files to audio
Split or slice videos
youtube-dl uses FFmpeg by default, but it can use AVConv for certain tasks.
For more information about Tartube's use of FFmpeg and AVConv, see 6.26 More information about FFmpeg and AVConv.
6.4.1 On MS Windows
On MS Windows, the usual methods of FFmpeg installation will not work. You must download an MSYS2-compatible version of FFmpeg. This can be done in the setup window, or from Tartube's main menu: click Operations > Install FFmpeg....
There is no known method of installing a compatible version of AVConv.
6.4.2 On Linux/BSD/MacOS
On all other operating systems, Tartube and youtube-dl should be able to find FFmpeg (and AVConv, if it is also installed) without any help from you.
If the FFmpeg / AVConv executables have been installed to an unusual location, you can tell Tartube where to find them.
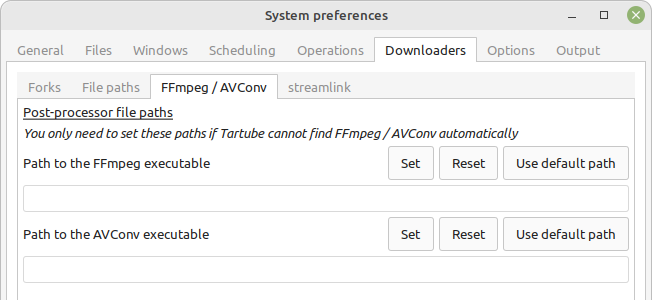
Click Edit > System preferences... > Downloaders > FFmpeg / AVConv
Click the Set buttons and select the FFmpeg or AVConv executable
Click the Reset buttons to remove that selection
Click the the Use default path buttons to use the normal location for each executable
6.5 Introducing system folders
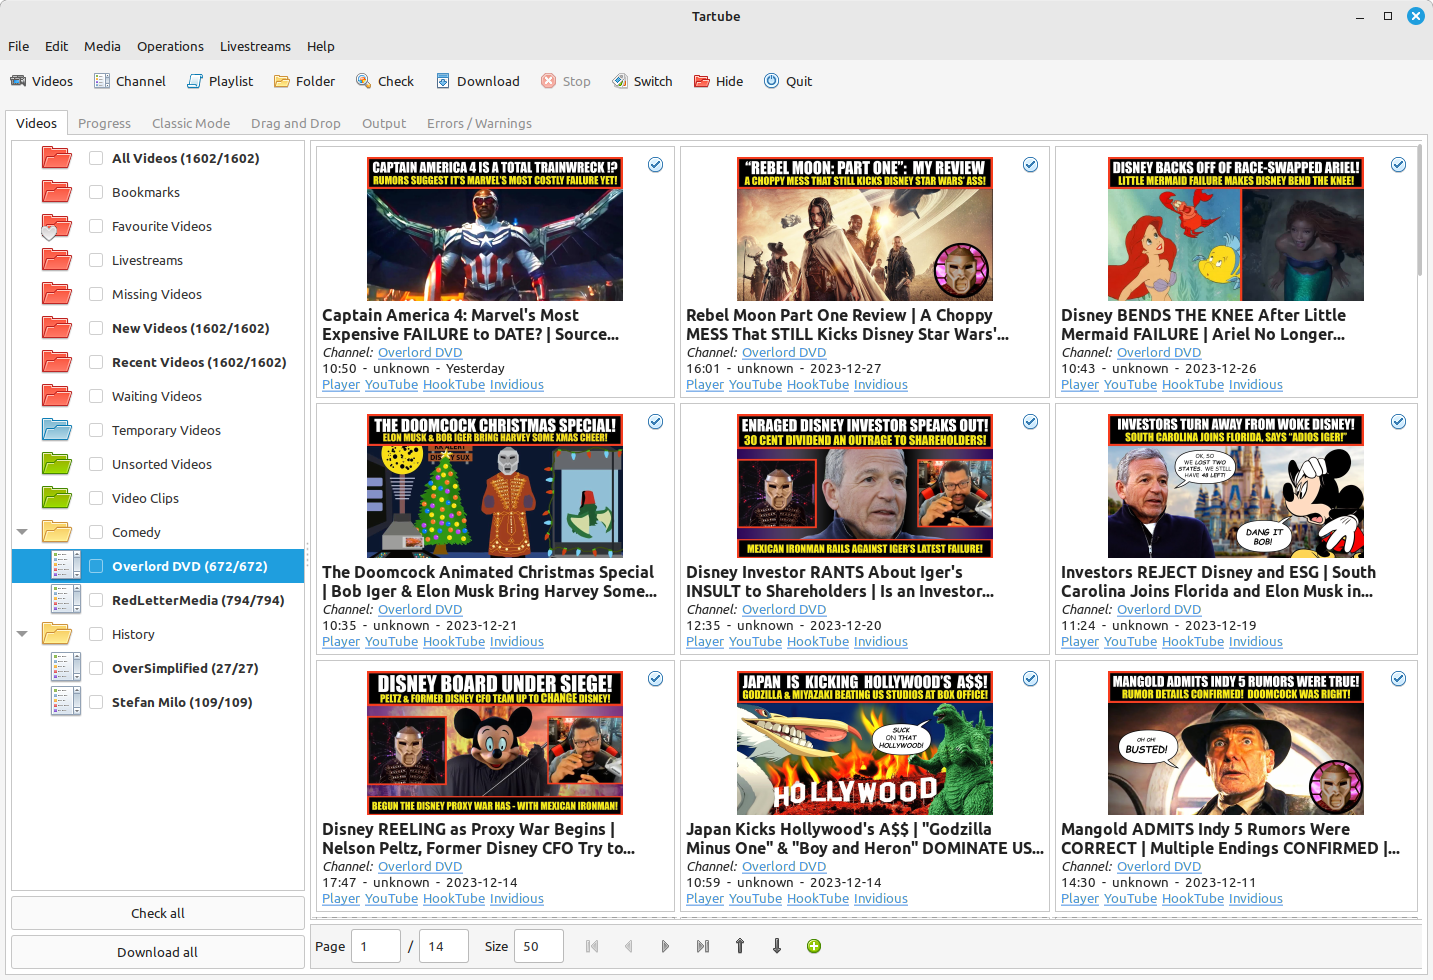
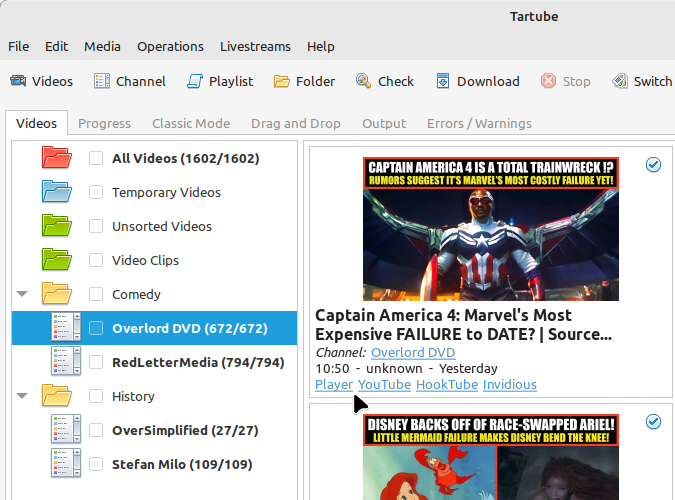
On the left side of the Tartube window is a list of folders. You can store videos, channels and playlists inside these folders. You can even store folders inside of other folders.
Tartube saves videos on your filesystem using exactly the same structure.
When you start Tartube for the first time, there are several folders already visible. You can't remove any of these folders (but you can hide them, if you want).
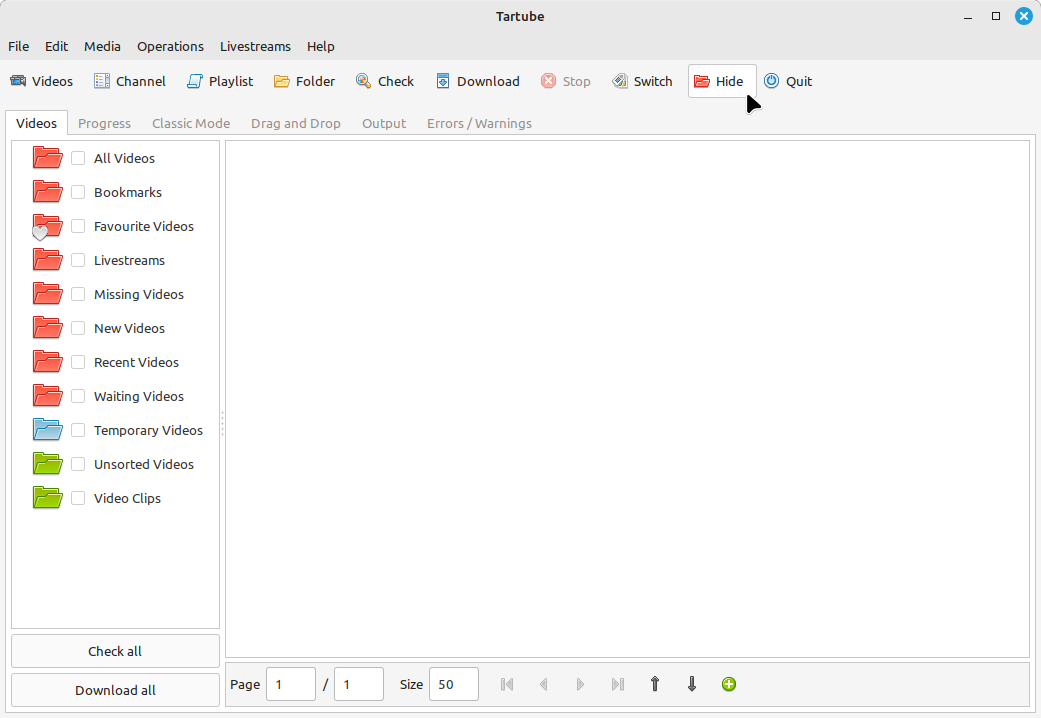
The All Videos folder shows every video in Tartube's database, whether it has been downloaded or not
The Bookmarks folder shows videos you've bookmarked, because they're interesting or important (see 6.17.1 Bookmarked videos )
The Favourite Videos folder shows videos in a channel, playlist or folder that you've marked as a favourite (see 6.17.2 Favourite channels, playlists and folders )
The Livestreams folder shows livestreams. Videos are automatically removed from this folder (but not from other folders) when the livestream is finished
The Missing videos folder (see 6.25 Detecting missing videos ) shows videos that you've downloaded, but which have since been removed from the website by their creator
The New Videos folder shows videos that have been downloaded, but not yet watched
The Recent Videos folder shows videos that were checked or downloaded, the last time you used youtube-dl (to change this behaviour, right-click the folder and select Downloads > Set removal time...)
The Waiting Videos folder shows videos that you want to watch soon. When you watch the video, it's automatically removed from the folder (but not from Tartube's database)
Videos saved to the Temporary Videos folder will be deleted when Tartube next starts
The Unsorted Videos folder is a useful place to put videos that don't belong to a particular channel or playlist
The Video Clips folder is a useful place to put video clips (see 6.27 Video clips)
6.6 Adding videos
If you want a simpler way to download videos, see 6.23 Classic Mode.
You can add individual videos by clicking the Add new videos button near the top of the window. (On MS Windows, the text is not visible unless your mouse is hovering over the button, which is in the top-left corner.)
A dialogue window will appear.
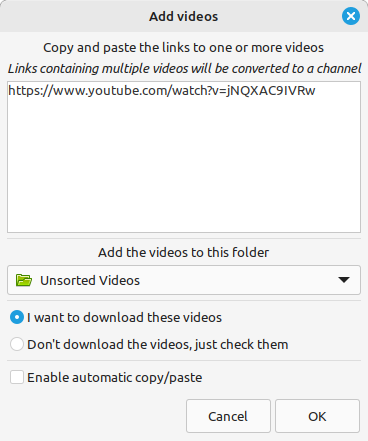
Copy and paste the video's URL into the dialogue window. You can copy and paste as many URLs as you like.
When you're ready, click the OK button.
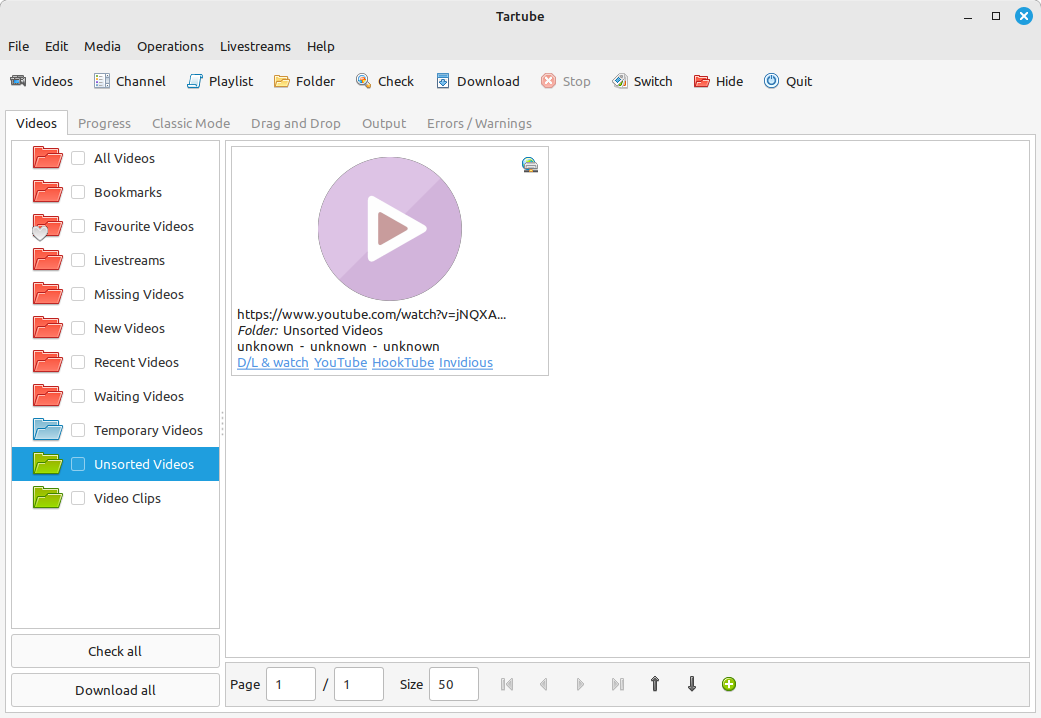
Finally, click on the Unsorted Videos folder to see the videos you've added.
6.7 Adding channels and playlists
You can also add a whole channel by clicking the Add a new channel button or a whole playlist by clicking the Add a new playlist button.
Tartube will download all of the videos in the channel or playlist.
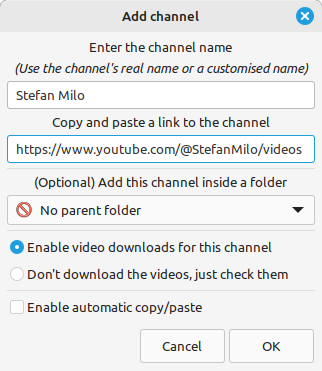
Copy and paste the channel's URL into the dialogue window. You should also give the channel a name. The channel's name is usually the name used on the website (but you can choose almost any name you like).
6.8 Adding videos, channels and playlists together
When adding a long list of URLs, containing a mixture of channels, playlists and individual videos, it's quicker to add them all at the same time. Click the Add new videos button near the top of the window, and paste all the links into the dialogue window.
Tartube doesn't know anything about these links until you actually download them (or check them). If it's expecting an individual video, but receives a channel or a playlist, Tartube will the handle the conversion for you.
By default, Tartube converts a link into a channel, when necessary. You can change this behaviour, if you want to.
In Tartube's main window, click Edit > System preferences... > Operations > Preferences
Select one of the buttons under URL flexibility preferences
Unfortunately, there is no way for Tartube to distinguish a channel from a playlist. Most video websites don't supply that information.
If your list of URLs contains a mixture of channels and playlists, you can convert one to the other after the download has finished.
In Tartube's main window, right-click a channel, and select Channel actions > Convert to playlist
Alternatively, right-click a playlist, and select Playlist actions > Convert to channel
After converting, you can set a name for the new channel/playlist by right-clicking it, and selecting Channel actions > Rename channel... or Playlist actions > Rename playlist...
6.8.1 Bulk-adding channels and playlists
If you're confident that your long list of URLs contains only channels and playlists, there are a couple of other ways to add them.
Firstly, you can click Media > Add many channels/playlists....
Secondly, you could import a text file contaiing a list of channels/playlists. You can write the text file yourself. Each channel/playlist is defined by three consecutive lines, in the following format:
@channel
Alice's Channel
<url>
@playlist
Bob's Playlist
<url>
... where <url> is the web address of the channel/playlist. (Leave out the diamond brackets.)
When you're ready, click Media > Export/import > Import into database...
6.8.2 Replacing generic channel/playlist names
There are several situations in which Tartube might create a channel with a generic name like channel_1, or a playlist with a generic name like playlist_2.
Click the Add video video(s) button, and enter a URL which is actually a channel or a playlist
Add several channels/playlists together by clicking Media > Add many channels/playlists...
In this situation, you can either rename all the new channels and playlists yourself, one at a time, or you can let Tartube try to do it automatically. (This works fine on YouTube and many other sites, but not necessarily on all of them.)
For each channel/playlist you want to rename, download or check at least one video
Tartube will extract the channel/playlist name from each video's metadata
In the main menu, click Media > Reset channel/playlist names...
Select everything you want to rename
When you're ready, click the OK button to perform the renaming
6.8.3 Replacing channel/playlist URLs in bulk
If you need to update the URLs of many channels and playlists, you can do so by clicking Edit > System preferences... > Files > URLs.
6.9 Adding folders
The left-hand side of the window will quickly still filling up. It's a good idea to create some folders, and to organise your channels/playlists inside those folders.
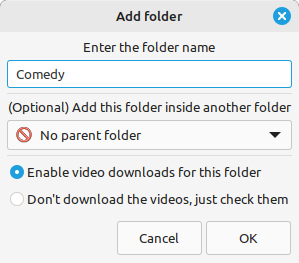
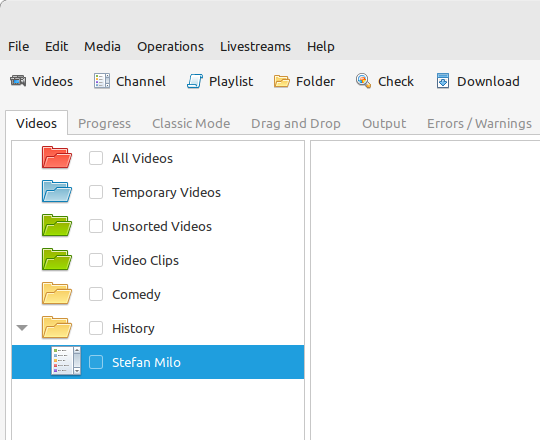
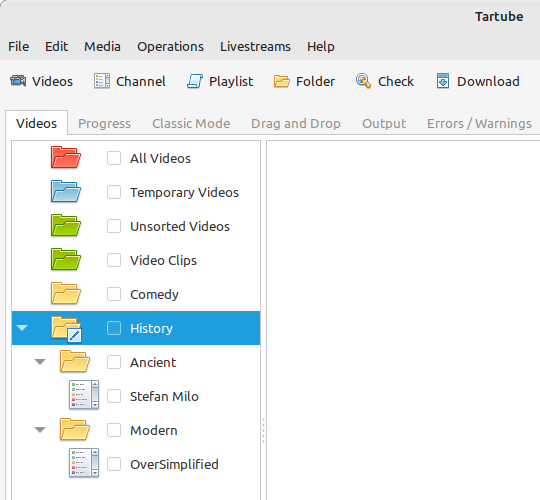
Click the Add a new folder button near the top of the window, and create a folder called Comedy.
Then repeat that process to create a folder called History. You can then drag-and-drop your channels and playlists into those folders.
6.10 Things you can do
Once you've finished adding videos, channels, playlists and folders, you can make Tartube do something. Tartube offers the following operations:
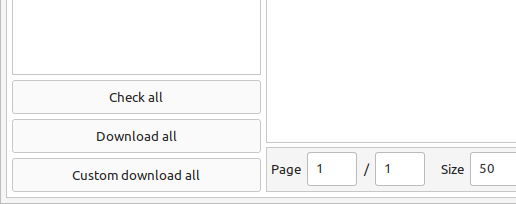
Checking/download videos:
Check - Fetches information about videos, but doesn't download them
Download - Actually downloads the videos. If you have disabled downloads for a particular item, Tartube will just fetch information about it instead
Custom download - Downloads videos in a non-standard way; see 6.14 Custom downloads
To Check or Download videos, channels and playlists, use the main menu, or the buttons near the top of the window, or the buttons in the bottom-left corner, or right-click an individual video, channel, playlist or folder
A Custom Download can be started from the main menu (Operations > Custom download all) or by right-clicking a video, channel, playlist or folder
Refreshing the database:
Refresh - Examines your filesystem. If you have manually copied any videos to the location in which Tartube stores its files, those videos are added to Tartube's database
To Refresh Tartube's database, use the main menu (Operations > Refresh database...) or right-click a channel/playlist/folder
Protip: Do a 'Check' operation before you do 'Refresh' operation
Updating packages:
Update - Installs or updates youtube-dl, as described in 6.2 Updating the downloader. On MS Windows, also installs FFmpeg (see 6.4 Installing FFmpeg / AVConv), matplotlib (see 7.31 Graphs not visible) and streamlink (see 6.24 Livestreams)
Protip: Do an 'Update' operation before you do a 'Check' or 'Download' operation
Fetching information:
Info - Fetches information about a particular video: either the available video/audio formats, or the available subtitles
To fetch Info about a video, right-click it and select Fetch
Tidying up the filesytem:
Tidy - Tidies up Tartube's data directory (folder), as well as checking that downloaded videos still exist and are not corrupted
To Tidy the data directory, use the main menu (Operations > Tidy up files...) or right-click a channel/playlist/folder
Dealing with livestreams:
Livestream check - Checks whether any livestreams have started (or stopped), without fetching the full list of videos from a channel/playlist
Livestream download - Downloads a livestream that's broadcasting now; see 6.24.4 Downloading livestreams
A Livestream check happens every few minutes (if Tartube detected livestreams during a Check or a Download). To force a check now, click Livestreams > Update existing livestreams
Processing videos with FFmpeg:
Process - Processes videos and thumbnails with FFmpeg - see 6.26 More information about FFmpeg and AVConv
To process video(s) and/or their thumbnails, right-click a video and select Special > Process with FFmpeg...
6.11 Profiles
Next to each channel, playlist and folder is a checkbox. Click one or more of the checkboxes, and the buttoms in the bottom-left corner of the Videos tab will change:

This is one way of checking or downloading just some of the channels, playlists and folders. Other methods include:
Right-click a channel, and select Download channel (and so on)
Move channels and playlists into a single folder, then right-click that folder and select Download folder
If you frequently mark a group of channels, playlists and folders for download, then you can create a profile. A profile is just a list of items that have been marked for download.
Click Media > Profiles > Create profile
In the dialogue window, choose a profile name, then click OK to create the profile
Later, click Media > Profiles > Switch profile to mark the same items for download
If you select Media > Profiles > Remember last profile, then Tartube will automatically switch to that profile, whenever the database is loaded.
Note that the red system folders can't be marked for download.
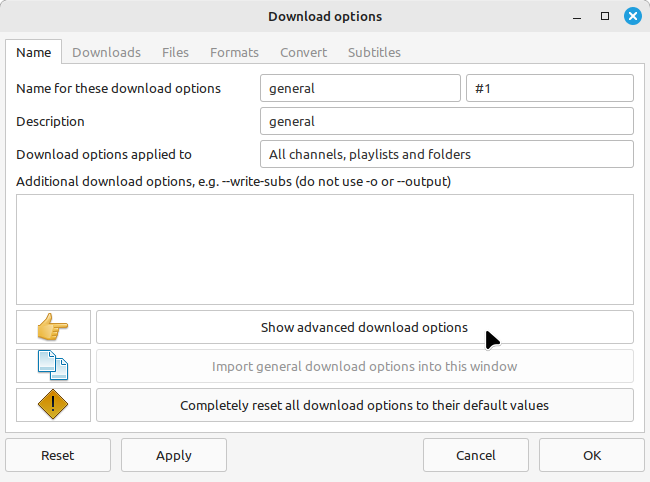
6.12 Download options
youtube-dl offers a large number of download options. This is how to set them.

Click Edit > General download options...
A new window opens. Any changes you make in this window aren't actually applied until you click the 'Apply' or 'OK' buttons.
6.12.1 Advanced download options
Some of the options are intended for advanced users, so they're hidden by default. To reveal them, click the button Show advanced download options.
After clicking the button, some new tabs will appear. The existing tabs will also have some new features.
6.12.2 Other download options
When you click Edit > General download options..., you are seeing the default download options. If you want to apply a different set of download options to a particular channel or particular playlist, you can do so.
At the moment, the general download options apply to all the videos, channels, playlists and folders you've added.

Now, suppose you want to apply some download options to the History folder:
Right-click the folder, and select Downloads > Apply download options...
In the new window, select Create new download options, and then click the OK button. A second window will appear, so you can click the OK button there, too.
The new options are applied to everything in the History folder. A pen icon appears above the folder to remind you of this.
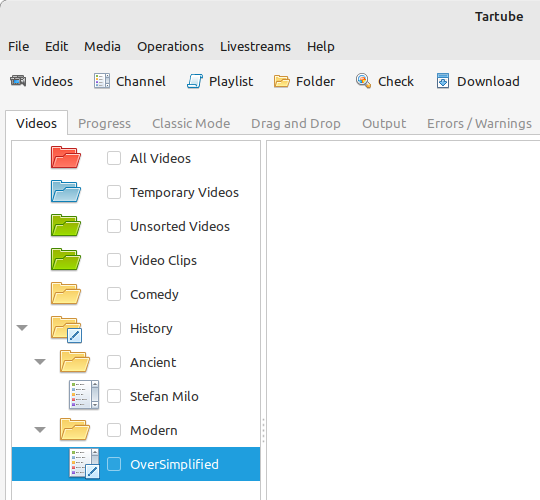
Now, suppose you want to add a different set of download options, but only for the channel OverSimplified.
Right-click the channel, and select Downloads > Apply download options...
In the new windows, click the OK button
The previous set of download options still applies to everything in the History folder, except the channel OverSimplified.
6.12.3 Managing download options
In fact, you can create as many sets of download options as you like.
Click Edit > System preferences... > Options > Download options
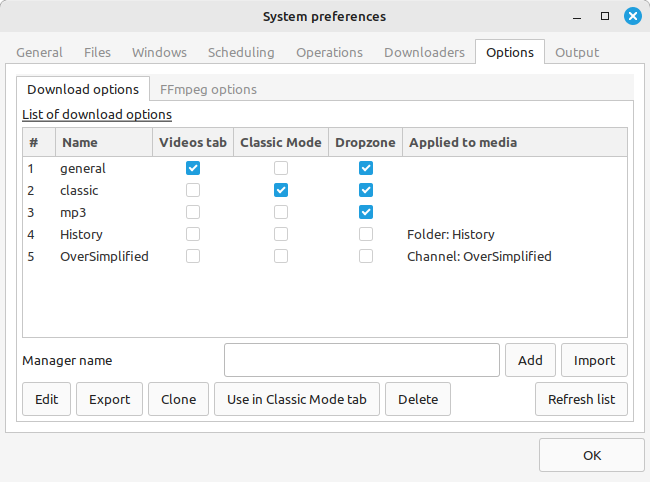
The first item in the list, general, is the default set of download options. The second item, classic, is the set of download options that apply in the Classic Mode tab (see 6.23 Classic Mode).
Download options are saved in the Tartube database, so if you switch databases (see 6.21.2 Multiple databases), a different selection of download options will apply. If you want to move a set of download options from one database to another, you can Export them, then switch databases, then Import them.
6.12.4 Setting download options
Here is a quick summary of the download options that are most useful, assuming that advanced download options are hidden (see 6.12.1 Advanced download options).
You can change the format of the filename for the downloaded video, so it includes useful information such as the playlist number or the video resolution.
Click Files > File names
In the drop-down box marked Format for video file names, select one of the options
If you select the Custom option, the drop-down boxes and buttons below become useable
When you download a video, a thumbnail and a metadata file are usually downloaded too. This can be customised.
Click Files > Write/move to select which files are downloaded
Click Files > Keep to select which files are not deleted at the end of the download operation
If you want to specify which video and audio formats should be downloaded, at which resolution and at which bitrate, do this:
Click the Formats tab
From the list on the left, select one of the video/audio formats
Click the Add format button
youtube-dl downloads very high-resolution videos as two separate files, video and audio. If Ffmpeg is installed, the two separate files are automatically merged into one output file.
If you want to specify the format of the output file, for example to create an .mp4 file, do this:
Click Files > Formats
From the list on the left, select mp4
Click the Add format button
In the drop-down box marked If a merge is required after post-processing, output to this format, select mp4
Most videos cannot be downloaded in every media format. For example, YouTube does not offer mp3 downloads. If you want files in a particular video/audio format, often it's necessary to use Ffmpeg to convert the downloaded video.
Click Files > Convert
Select a video and/or audio format
youtube-dl can download subtitles for a video, if they exist. The chat replay of YouTube livestreams can also be downloaded, and is handled as if it were another set of subtitles.
Click Subtitles > Options
Select Download all available subtitle files
If you want to download subtiles only in particular languages:
Select Download subtitles file for these languages
Select a language from the list on the left
Click the Add language button
Repeat for as many languages as you want
See also 6.14.7 Ignoring videos without subtitles.
6.12.5 Customising download options
If you want to set the download options manually - typing them, rather than clicking some buttons - you can do so.
Click Edit > General download options...
In the Additional download options box, type any download options
For example, to download a video as an .mp3 file, you could type -x --audio-format mp3

Download options added here override everything else in the window. (However, they don't override the format selector in the Classic Mode tab.)
You can find a complete list of download options for youtude-dl here, and a complete list for yt-dlp here.
6.13 Scheduled downloads
Tartube can check and download videos, channels and playlists on a regular schedule. This is very useful if you want to leave Tartube running unattended.
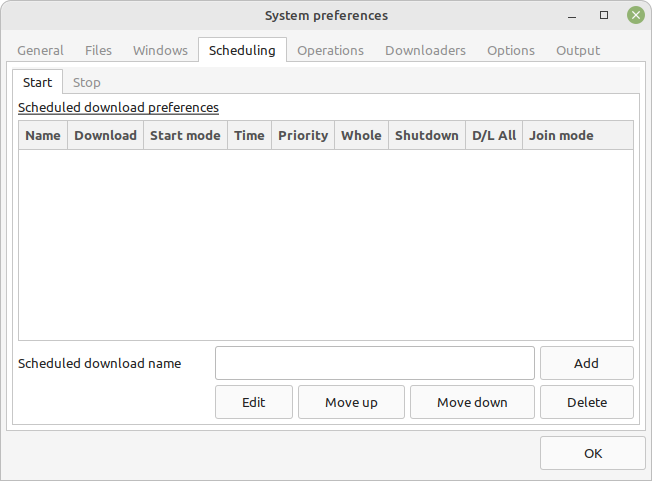
Click Edit > System preferences... > Scheduling > Start
In the box, type a name for the scheduled download, for example test
Click the Add button to create the scheduled download
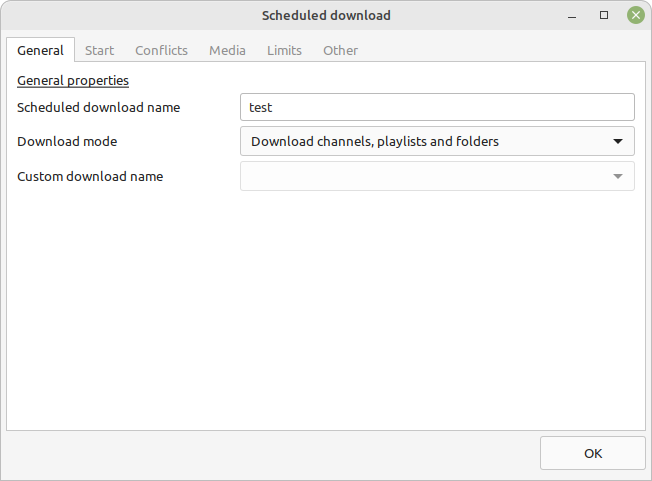
A new window appears. You can use this window to congifure the scheduled download.
In the Download mode box, select whether Tartube should check videos, download them, or perform a custom download (see 6.14 Custom downloads)
In the Start tab, select whether this download should be performed once, or when Tartube starts, or at regular intervals, or at specified times
When you specify a start time like 'Mondays at 15:00', there is a five-minute window in which the scheduled download can begin. This means that, if you open Tartube at 15:02, the scheduled download will still start (but not if you open Tartube at 15:10).
Now click the Media tab. By default, a scheduled download checks or downloads everything in Tartube's database, but if you don't want that, you can select individual channels, playlists and folders.
There are several ways to add channels, playlists and folders to this list:
In the dropdown box, select the channel/playlist/folder, and click Add
In the main window's Videos tab, right-click the channel/playlist/folder and select Downloads > Add to scheduled download...
Drag and drop the channel/playlist/folder from the main window into this window
You can create as many scheduled downloads as you like. Scheduled downloads are performed in order, from the top of the list to the bottom.
6.14 Custom downloads
By default, Tartube downloads videos as quickly as possible, one URL (link) at a time. A URL might point to an individual video, or it might point to a whole channel or playlist. Tartube will try to download every video associated with the URL.
A Custom download enables you to modify this behaviour, if desired. You can use it to fetch videos from a mirror, add random delays, download video clips, download (or ignore) only livestreams, ignore videos without subtitles, or to download videos with the adverts removed.
It's important to note that a custom download behaves exactly like a regular download until you specify the new behaviour.
6.14.1 Default custom downloads
By default, Tartube provides two custom downloads.
The custom download called general applies in the Videos tab. It is used, for example, when you right-click a channel and select Custom download channel.
If you use the general custom download a lot, you can add an extra button to the Videos tab.
Click Edit > System preferences... > Windows > Videos
Select the button Show a 'Custom download all' button in the Videos tab
The custom download called classic applies in the Classic Mode tab. To enable it, right-click the menu button in the top-right corner of the tab, and select Enable custom downloads.
6.14.2 Adding custom downloads
In addition to the those, you can create as many new custom downloads as you want.
Click Edit > System preferences... > Operations > Custom
In the Name box, type any name
Click the Add button
A new window opens, in which you can specify the new behaviour
Now, when you select a custom download in the Videos tab (for example, by right-clicking a channel and selecting Custom download channel, you'll be prompted to choose the custom download you want.
6.14.3 Independent downloads
By default, Tartube instructs youtube-dl to download a channel or a playlist. youtube-dl only needs a link to the channel or playlist, so Tartube doesn't send it a link to every single video.
If you need to download each individual video, one URL at a time, you can do this:
Open the window for your preferred custom download. For example, click Edit > System preferences... > Operations > Custom, click general to select it, and click the Edit button
In the new window, click Download each video independently of its channel or playlist to select it
If it is not already selected, click Check channels/playlists/folders before each custom download
Click OK to close the window
Many custom download settings only work when Tartube is downloading videos one at a time. If you enable this setting, you will be able to enable several other settings in the other tabs.
6.14.4 Diverting to HookTube / Invidious
If Tartube can't download a video from YouTube, it's sometimes possible to obtain it from an alternative website instead.
Open the window for your preferred custom download. For example, click Edit > System preferences... > Operations > Custom, click general to select it, and click the Edit button
In the new window, click the Mirrors tab
Click Obtain the video from HookTube rather than YouTube to select it
Click OK to close the window
You can now start the custom download
There are a number of alternative YouTube front-ends available, besides HookTube. The original Invidious closed in September 2020, but there are a number of mirrors, such as this one. To get a list of mirrors, see this page, or use your favourite search engine.
When specifying an alternative website, it's very important that you type the exact text that replaces youtube.com in a video's URL. For example, you must type hooktube.com, not www.hooktube.com or http://www.hooktube.com/.
6.14.5 Delays between downloads
If the video website is complaining that you're making too many requests (in other words, downloading too many videos too quickly), it's possible to add a delay betwen downloads. The delay can have a fixed or random duration.
Open the window for your preferred custom download. For example, click Edit > System preferences... > Operations > Custom, click general to select it, and click the Edit button
In the new window, click the Delays tab
Click Apply a delay after each video/channel/playlist is downloaded to select it
Set the maximum delay (in minutes)
If you also set a minimum delay. If you do, Tartube uses a random value between the maximum and minimum
Click OK to close the window
You can now start the custom download
The delay is applied after downloading a channel or a playlist. If you want to apply the delay after each video, you should enable individual video downloads as well (as described above).
6.14.6 Splitting and slicing videos
During a custom download, you can automatically split a video into video clips while it is being downloaded. A list of clips can be grabbed from the video's description, or from its chapter list, or you can specify your own list of clips. For more information, see see 6.27 Video clips
You can also remove slices from a video while it is being downloaded. This is useful for removing adverts, intros and outros. A list of video slices is obtained from a SponsorBlock server. Alternatively, you can specify your own list of video slices. For more information, see see 6.28 Video slices
Both of these features require FFmpeg.
6.14.7 Ignoring videos without subtitles
You can ask Tartube not to download videos without subtitles.
Open the window for your preferred custom download. For example, click Edit > System preferences... > Operations > Custom, click general to select it, and click the Edit button
In the new window, click the Subtitles tab
Click Only download videos with available subtitles to select it
Click OK to close the window
You can now start the custom download
Note that this setting reduces the number of videos downloaded. It isn't responsible for downloading the subtitles themselves. Here is how to do that:
In Tartube's main menu, click Edit > General download options > Subtitles > Options
Select Download all available subtitle files
Alternatively, select Download subtitle files for these languages, and then add one or more languages below
Click OK to close the window
You can now start the custom download
youtube-dl handles YouTube live chat in the same way as subtitles, so you can select that instead of (or as well as) the languages.
6.14.8 Launching custom downloads
Besides the optional button described above, there are several ways to start a custom download.
Right-click a video, and select Custom download video
Right-click a channel, playlist or folder, and select Custom download channel, and so on
In the Classic Mode tab, click the menu icon in the top-right corner, and select Enable custom downloads. When you're ready to begin, click the Custom download all button in the bottom-right corner
From the main menu, click Operations > Custom download all
6.15 Watching videos
If you've downloaded a video, you can watch it by clicking the word Player.
If you haven't downloaded the video yet, you can watch it online by clicking the word YouTube, Twitch, Website, Odysee, BitChute or Website. (One or the other will be visible).
Restricted YouTube videos (not available in your region, or not visible without a Google account) can sometimes be watched without restrictions on an alternative website, such as HookTube or an Invidious mirror such as this one.
As mentioned above, the original Invidious server has now closed. You can change the Invidious mirror that Tartube is using, if you like.
Click Edit > System preferences... > Operations > Mirrors
Enter a new Invidious mirror in the box
Click OK to close the window
You can now watch a video by clicking its Invidious label
6.16 Filtering and finding videos
Beneath the videos you'll find a toolbar. The buttons are self-explanatory, except for the one on the right.
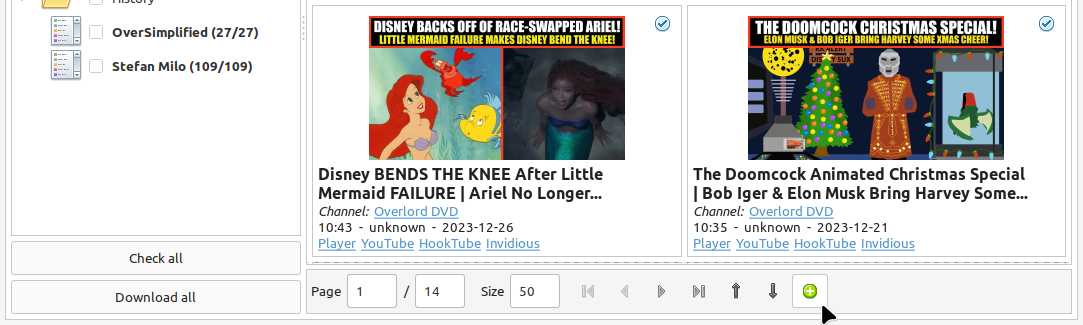
Click that button, and a larger toolbar is revealed. You can use this to filter out videos, change the order in which videos are displayed, or find a video uploaded at a certain date.
Use the Sort box to change how videos are sorted. The button next to it can be used at any time force a re-sort
Use the Thumbnail size box to change the size of the video grid (it doesn't affect other layouts)
Toggle the Frame and Icons buttons to tweak the layout
You can search for videos by applying a filter. For example, you could search for videos whose name contains the word History:
In the Filter box, type History
The search is case-insensitive, so it doesn't matter if you type History or history
Click the magnifiying glass button. All matching videos are displayed
Click the cancel button next it to remove the filter
You can also search using a regular expression (regex), too. These searches are also case-insensitive. For example, to find all videos whose name begins with the word "Minecraft":
In the Filter box, type ^Minecraft
Click the Regex button to select it
Click the magnifying glass button. All matching videos are displayed
To search using ordinary text, rather than a regex, de-select the Regex button
By default, the search applies to video names. You can toggle to buttons so it applies to descriptions and/or comments, as well.
Alternatively, you can find videos uploaded around a certain date.
Click the Find date button to select a date
If there are several pages of videos, Tartube will show the page containing the videos uploaded closest to this date
6.17 Marking videos
You can mark videos, channels, playlists and folders that you find interesting, or which are important.
You can bookmark a video
You can favourite a channel, playlist or folder
Bookmarked and favourite videos shouldn't be confused with archived videos, which are protected from automatic deletion - see 6.19 Archiving videos.
6.17.1 Bookmarked videos
There are several ways to bookmark a video.
Right-click a video, and click Mark Video > Video is bookmarked to select it
If the B/mark label is visible under the video's name, click it. (If not, click the Switch button to select a different layout)
Right-click a channel, and select Channel contents > Mark as bookmarked. This will bookmark every video in the channel, but it won't automatically bookmark videos that are added to the channel later
(This can also be done with playlists and folders)
A bookmarked video appears in Tartube's own Bookmarks folder, as well as in its usual location.
6.17.2 Favourite channels, playlists and folders
When you mark a channel, playlist or folder as a favourite, all of its videos will also be visible in Tartube's own Favourite Videos folder.
If new videos are later added to the channel, playlist or folder, they will automatically appear in the Favourite Videos folder.
(It's possible to mark or unmark an individual video as a favourite, but it's better to use bookmarking for that.)
Right-click a channel, and select Channel contents > Mark as favourite
Right-click a playlist, and select Playlist contents > Mark as favourite
Right-click a folder, and select Folder contents > All contents > Mark as favourite
If you just want to mark the videos in a folder as favourites, but not any channels or playlists it contains, select Folder contents > Just folder videos > Mark as favourite
6.18 Combining channels, playlists and folders
Tartube can download videos from several channels and/or playlists into a single directory (folder) on your computer's filesystem. There are four situations in which this might be useful:
A channel has several playlists. You have added both the channel and its playlists to Tartube's database, but you don't want to download duplicate videos
A creator releases their videos on Odysee as well as on YouTube. You have added both channels, but you don't want to download duplicate videos
You don't care about keeping videos in separate directories/folders on your filesystem. You just want to download all videos to one location
A separate application will process the videos, after Tartube has downloaded them
6.18.1 Combining one channel and many playlists
A creator might have a single channel, and several playlists. The playlists contain videos from that channel (but not necessarily every video).
You can add the channel and its playlists in the normal way but, if you do, Tartube will download many videos twice.
The solution is to tell Tartube to store all the videos from the channel and its playlists in a single location. In that way, you can still see a list of videos in each playlist, but duplicate videos are not actually downloaded.
Click Media > Add channel..., and then enter the channel's details
Click Media > Add playlist... for each playlist
Now, right-click on each playlist in turn, and then select Downloads > Set download destination...
In the dialogue window, click Use a different location, select the name of the channel, then click the OK button.
A quicker way to add multiple playlists is from Tartube's main menu. Click Media > Add many channels/playlists....
6.18.2 Extracting playlists from a channel
As described above, a creator might have a single channel, and several playlists. If there are a lot of playlists, it might take a long time to add them all to Tartube's database. However, there is a shortcut for YouTube channels.
On the channel's webpage, click the Playlists tab
Add a new channel to Tartube's database, using this URL (which should end in ../playlists)
YouTube does not always send us the list of playlists; that's why it's necessary to click the Playlists tab, rather than the Videos tab, as we normally would.
Now you have two choices. If you want to keep the original channel in your database, without downloading duplicate videos, do this:
In Tartube's main window, right-click the channel, and select Check channel
When the operation has finished, right-click the channel and select Show > Channel properties... > Associated Playlists
Select the button Set the channel as the download destination
Click the Add all playlists button
Click OK to close the window
On the channel's webpage, click the Videos tab
In Tartube's main window, right-click the channel, and select Channel actions > Set URL..., and replace the URL with the one ending in ../videos
Alternatively, if you don't want to keep the original channel, do this:
In Tartube's main window, right-click the channel, and select Check channel
When the operation has finished, right-click the channel and select Show > Channel properties... > Associated Playlists
Click the Add all playlists button
Click OK to close the window
When you're ready, delete the channel
6.18.3 Combining channels from different websites
A creator might release their videos on YouTube, but also on a site like Odysee. Sometimes they will only release a particular video on Odysee.
You can add both channels in the normal way but, if you do, Tartube will download many videos twice.
The solution is to tell Tartube to store videos from both channels in a single location. In that way, you can still see a list of videos in each channel, but duplicate videos are not actually downloaded.
Click Media > Add channel..., and then enter the YouTube channel's details
Click Media > Add channel..., and then enter the Odysee channel's details
Right-click the Odysee channel and select Downloads > Set download destination...
In the dialogue window, click Use a different location, select the name of the YouTube channel, then click the OK button
It doesn't matter which of the two channels you use as the download destination. There is also no limit to the number of parallel channels, so if a creator uploads videos to a dozen different websites, you can add them all.
6.18.4 Download all videos to a single folder
If you don't care about keeping videos in separate directories/folders on your filesystem, you can download all videos into the Unsorted videos folder. Regardless of whether you have added one channel or a thousand, all the videos will be stored in that one location.
Click Edit > General download options... > Files > Filesystem
Click the Download all videos into this folder button to select it
In the combo next to it, select Unsorted Videos
Alternatively, you could select Temporary Videos. If you do, videos will be deleted when you restart Tartube.
6.18.5 Download all videos to an external folder
By default, all files are downloaded into Tartube's data folder. Users often request that Tartube should be able to download videos to other locations in the filesystem, while retaining those videos in Tartube's database.
A whole bunch of things can go wrong when we start writing files to arbitrary locations on hard drives that may or may not be accessible in the future. Tartube is simply not designed to handle file input/output of that complexity.
In addition, writing files outside Tartube's data folder breaks portability because it's no longer possible for the folder to be copied or moved anywhere else.
Nevertheless, since v2.4.0 it has been possible to download videos to any location in the filesystem for which you have read/write permissions. (It has always been possible to do so from the Classic Mode tab). Don't do it without a good reason. Good reasons include:
A separate application will process the videos, after Tartube has downloaded them
You want some videos (but not others) to be available on a drive shared between several devices
You are an advanced user and you're happy to deal with any filesystem problems yourself
If one of these reasons applies, then you can do this:
Right-click a channel, playlist or folder, and select Downloads > Set download destination... (etc)
Select Use an external location
Click the Set button, and choose an external folder
When you're ready, click the OK button to apply your changes
6.18.6 External folders and yt-dlp
Users of yt-dlp should be aware of the download option --paths, which may be more convenient in some situations. See the yt-dlp documentation for more information about how it works. In Tartube, it can be configured like this:
Click Edit > General download options...
If the Show advanced download options button is visible, click it
The option --output can be set in the Files > Override tab
The option --paths can be set in the Files > Paths tab
6.19 Archiving videos
You can tell Tartube to automatically delete videos after some period of time. This is useful if hard drive is smaller than the size of the observable universe.
Click Edit > System preferences... > Files > Delete
Click the Automatically delete downloaded videos button to select it
If you want to, change the number of days from 30 to some other value
Alternatively, you can select Remove downloaded videos from the database (but don't delete files).
If you want to protect your favourite videos from being deleted or removed automatically, you can archive them. Only videos that have actually been downloaded can be archived.
Right-click a video, and select Video is archived
You can also archive all the videos in a channel, playlist or folder.
For example, right-click a folder and select Channel contents > Mark videos as archived
This action applies to all videos that are currently in the folder, including the contents of any channels and playlists in that folder
It doesn't apply to any videos you might download in the future
6.20 Performance limits
By default, Tartube downloads two video, channels or playlists at a time, as quickly as possible (in other words, without bandwidth limits).
You can change this behaviour in the Progress tab, if you want.
At the bottom of the tab, select the Max downloads button, and change the maximum number of simultaneous downloads
Alternatively, select the D/L speed button, and set the maximum bandwidth you're willing to allocate to Tartube
These are the default settings. Many users might want lower download speeds during the day, but higher download speeds at night (and so on).
Click Edit > System preferences... > Operations > Limits
The settings in the top half of the tab are the ones visible in the Progress tab
The settings in the bottom half of the tab apply only during certain times of the day, and on certain days
There is a third way to change Tartube's behaviour. The maximum downloads and bandwidth limits can also be set for a scheduled download (see 6.13 Scheduled downloads).
Tartube honours most requests to change the maximum downloads and the bandwidth limit, so it's not a good idea to set lots of different values.
6.21 Managing databases
Tartube downloads all of its videos into a single directory (folder) - the Tartube data directory. The contents of this directory comprise the Tartube database.
Tartube stores important files here, some of which are invisible (by default). Don't let other applications store their files here, too.
You can modify the contents of the directory yourself, if you want, but don't do that while Tartube is running.
It's fine to add new videos to the database, or to remove them. Just be careful that you don't delete any sub-directories (folders), including those which are hidden, and don't modify the Tartube database file, tartube.db.
6.21.1 Importing videos from other applications
Tartube is a GUI front-end for youtube-dl, but it is not the only one. If you've downloaded videos using another application, this is how to add them to Tartube's database.
In Tartube's main window, add each channel and playlist in the normal way
When you're ready, click the Check all button. This adds a list of videos to Tartube's database, without actually downloading the videos themselves
Now copy the video files into Tartube's data directory (folder). For example, copy all your Games Channel videos into ../tartube-data/Games Channel
In the Tartube menu, click Operations > Refresh database...
Tartube will search for video files, and try to match them with the list of videos you just compiled
The whole process might some time, so be patient
6.21.2 Multiple databases
Tartube can only use one database at a time, but you can create as many databases as you want.
For example, you could create a new database on an external hard drive.
In the main window's menu, click File > Database preferences...
In the new window, click the Add new database button
Another new window appears. Use it to create a directory (folder) on your external hard drive
Tartube remembers the location of the databases it has loaded. To switch back to your original database:
In the main menu, click File > Database preferences...
In the list, click the original database to select it
Click the Switch to this database button
6.21.3 Multiple Tartubes
Tartube can't load more than one database, but you can run as many instances of Tartube as you want.
If you have added three databases to the list, and if you have three Tartube windows open at the same time, then by default each window will be using a different database.
By default, the databases are loaded in the order they appear in the list.
6.21.4 Exporting/importing the database
You can export the contents of Tartube's database and, at any time in the future, import that information into a different Tartube database, perhaps on a different computer.
It is important to note that only a list of videos, channels, playlists and folders are exported. The videos themselves are not exported, and neither are any thumbnail, description or metadata files.
Click Media > Export/import > Export from database...
In the dialogue window, choose what you want to export
If you want a list that you can edit in an ordinary text editor, select the Export as plain text option
If you want a list that you can edit in a spreadsheet, select the Export as CSV option
Otherwise, you should select the Export as JSON option
Click the OK button, then select where to save the export file
It is safe to share this export file with other people. It doesn't contain any personal information.
This is how to import the data into a different Tartube database.
Click Media > Export/import > Import into database...
Select the export file you created earlier
A dialogue window will appear. You can choose how much of the database you want to import
6.21.5 Importing from YouTube
You can also import your YouTube subscriptions directly.
Click Media > Export/import > Import YouTube subscriptions
A wizard window opens, showing you how to export your YouTube subscriptions as a single .zip file
When you have the export file, click the Next button
Click Select file, and choose the export file
If the file is valid, click the Next button again
Select the channels you want to import, then click OK to update Tartube's database
If you have a lot of channels to import, you might want to import them into a folder.
In the Videos tab, create a new folder, or select an existing folder
Click Media > Import YouTube subscriptions, and continue as above
6.21.6 Old Export formats
The format of exported plain text/CSV files changed in v2.3.208, and again in v2.3.307. If you try to import files from earlier versions, you may not get everything you were expecting.
Here are some notes for anyone who wants to edit the CSV export by hand (for example, in a spreadsheet):
There are six columns
A parent channel/playlist/folder is always listed directly above its child videos/channels/playlists/folders
The first column should contain the string video, channel, playlist or folder
The second column is the name of the video/channel/playlist/folder. Note that channels/playlists/folders cannot share a name (but any number of duplicate video names are allowed)
The third column is the URL for a video, channel or playlist. This field is always empty for folders
The fourth column is the name of the parent channel, playlist or folder (or an empty field, if there is no parent)
The fifth and sixth columns apply only to videos. For channels/playlists/folders, they are always empty fields. For videos, they can still be empty fields, if the data is not known
The fifth column is the video ID supplied by the website
The sixth column is the video filename (e.g. my video.mp4)
Here are some notes for anyone who wants to edit the plain text export by hand:
Channels/playlists/folders are represnted by groups of four lines
Videos are represented by groups of six lines
Each group starts with the line @video, @channel, @playlist or @folder
A parent channel/playlist/folder is always listed directly above its child videos/channels/playlists/folders
Line 2 is the name of the video/channel/playlist/folder. Note that channels/playlists/folders cannot share a name (but any number of duplicate video names are allowed)
Line 3 is the URL for a video, channel or playlist. This line is always empty for folders
Line 4 is the name of the parent channel, playlist or folder (or an empty line, if there is no parent)
For videos, line 5 is the video ID supplied by the website (or an empty line, if the ID is unknown)
For videos, line 6 is the video filename (e.g. my video.mp4, or an empty line, if the filename is unknown)
6.22 Converting to audio
Tartube can automatically extract the audio from its downloaded videos, if that's what you want.
The first step is to make sure that either FFmpeg or AVconv is installed on your system - see 6.4 Installing FFmpeg / AVConv.
The remaining steps are simple:
In Tartube's main window, click Edit > General download options...
In the new window, click the Convert tab
Select the checkbox Download each video, extract the sound, and then discard the original video
In the boxes below, select an audio format and an audio quality
Click the OK button at the bottom of the window to apply your changes
Alternatively, if you have enabled advanced options (see 6.12.1 Advanced download options) then the Post-processing tab will be visible, and you can do this:
Click on the Post-processing tab
Select the checkbox Post-process video files to convert them to audio-only files
In the box labelled Audio format of the post-processed file, specify what type of audio file you want (.mp3, .wav, etc)
If you want, click the button Keep video file after processing it to select it
Click the OK button at the bottom of the window to apply your changes
Some websites, such as YouTube, allow you to download the audio (in .m4a format) directly, without downloading the whole video, and without using FFmpeg or AVconv.
In Tartube's main window, click Edit > General download options... > Formats
In the list on the left-hand side, select an .m4a format
Click the Add format button to add it to the list on the right
Click the OK button at the bottom of the window to apply your changes
6.23 Classic Mode
Tartube compiles a database of the videos, channels and playlists it has downloaded.
If you want something simpler, then click the Classic Mode tab, which has an interface that looks just like older GUIs.
Copy and paste the URLs (links) of videos, channels and/or playlists into the box at the top
Click the + button to select a destination. All the videos are downloaded to this location
Select a video or audio format and resolution, or leave the default settings enabled
The video might not exist in your preferred format, but if FFmpeg or AVConv is installed on your system, the video can be converted
Next, click the Add URLs button
If you like, you can add more videos/channels/playlists, using a different destination and/or a different format
When you're ready, click the Download all button
Tartube doesn't add any of these videos to its database. When you restart Tartube, all of the URLs will be gone. However, the videos themselves will still be on your hard drive.
Because the videos aren't in a database, you can move them anywhere you want (once you've finished downloading them).
Video clips and sliced videos can be created in this tab; see 6.27.3 Video clips in Classic Mode. and - see 6.28.3 Video slices in Classic Mode.
6.23.1 Customising Classic Mode
If you only use this tab, you can tell Tartube to open it automatically.
Click Edit > System preferences... > Windows > Main window
Select When Tartube starts, automatically open the Classic Mode tab
If you don't want Tartube to forget URLs when it restarts, you can do this:
In the Classic Mode tab, click the menu button in the top-right corner
Click Remember URLs to select it
Tartube will only remember URLs that haven't been downloaded yet
A separate set of download options (see 6.12 Download options) usually applies to the Classic Mode tab. You can change this behaviour, if you like.
Click the menu button in the top-right corner of the tab
Click Set download options to see the complete list of download options
Alternatively, click Use default download options to use the download options called general
In the same menu, custom downloads can be enabled (see 6.14 Custom downloads). Depending on the behaviour you've selected, Tartube may fetch a list of videos from each URL, before downloading them (so don't be alarmed if each URL is 'downloaded' twice).
In the bottom half of the window, you can select one or more URLs by clicking them. The buttons in the bottom-left apply to the selected URLs. Let your mouse hover over a button to see what it does.
6.24 Livestreams
Tartube can detect livestreams, and to notify you when they start. This feature works on YouTube, Odysee and Twitch. It might work on other websites, after a little configuration - see 6.24.5 Compatible websites.
Tartube can download livestreams while they are broadcasting. If streamlink is installed on your system, Tartube can use it; otherwise it will download the livestream using its .m3u manifest.
Youtube Stream Capture is deprecated, and Tartube no longer supports it.
6.24.1 Detecting livestreams
Tartube searches for livestreams whenever you check or download channels and playlists.
Livestreams are easy to spot. A livestream that hasn't started yet has a red background. A video that's streaming now has a green background. (Livestreams that have finished have a normal background.)
YouTube sometimes 'streams' a pre-recorded video at an pre-determined time, as if it were a livestream. These 'debut' or 'premiere' videos are shown in slightly different colours - orange before the stream starts, and cyan while it is in progress.

Every few minutes, Tartube checks whether a livestream (or debut) has started or stopped. This happens automatically in the background; there is no need for you to do anything.
6.24.2 Customising livestreams
You can modify how often livestreams are detected. If you are using yt-dlp, you can also prevent livestreams from being downloaded at all. Click Livestreams > Livestream preferences....
For technical reasons, there are practical limits to what Tartube can detect. On busy channels, Tartube may not be able to detect livestreams that were announced some time ago. Even if you change the number of days from 7 to a very large number, there is no guarantee that Tartube will detect everything. (If you change the value to 0, Tartube will only detect livestreams that are listed before any ordinary videos.)
By default, Tartube checks a livestream every three minutes, waiting for it to start (or stop). When a livestream is due to start, a check happens every minute. Making more frequent checks is probably not a good idea - the video website might block you.
If you want to force a check, in the main window click Livestreams > Update existing livestreams. (Checks are silent, so don't worry if nothing seems to be happening).
6.24.3 Livestream notifications
It's really useful to be notified when a livestream is starting. In the same window, click the Operations > Actions tab.
Desktop notifications do not work on MS Windows.
Tartube provides a number of sound effects. You can choose the one you want to use as an alarm. If you want to add your own sound effects, find the directory (folder) where Tartube is installed, copy the new .mp3 or .wav files into ../sounds, and then restart Tartube.
Most users will prefer to leave all of these checkboxes unselected, and instead set up notifications only for the livestreams they want to see.
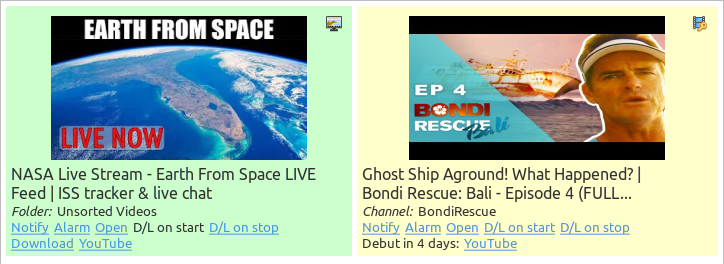
Click Notify to show a desktop notification when the stream starts (does not work on MS Windows)
Click Alarm to sound an alarm when the stream starts
Click Open to open the stream in your web browser as soon as it starts
If you think the stream might be removed from the website, you can click D/L on start or D/L on stop. If you click both of them, Tartube will download the video twice. (Think of the second one as a backup, in case the first download doesn't succeed.)
To disable any of these actions, simply click the same label again.
6.24.4 Downloading livestreams
Tartube can download a livestream while it is still broadcasting. (A livestream that has already finished is treated like any other video.)
There are three different ways to download a livestream. The default method is to use youtube-dl, fetching the video's .m3u manifest before downloading it.
If streamlink is installed on your system, you can use that, instead. MS Windows users can install streamlink from Tartube's main menu (click Operations > Install streamlink).
Direct downloads using youtube-dl alone are sometimes possible, but are not recommended.
You can choose your preferred method by clicking Edit > System preferences... > Operations > Livestreams, and selecting one of the three options.
Note that none of these methods can download a livestream from the very beginning.
6.24.5 Compatible websites
Livestream downloads should work on most websites. streamlink works on most popular websites, but not necessarily on all of them.
Tartube's livestream detection works on YouTube, Odysee and Twitch. It might work on other websites, after a little configuration. Here is how to set that up.
Firstly, find the RSS feed for the channel or playlist. You may have to use a search engine to find out how to do that, but first try this site and this one.
Secondly, right-click the channel and select Show > Channel properties... (alternatively, right-click a playlist and select Show > Playlist properties...)
Now click the RSS feed tab. Enter the link (URL) to the RSS feed in the box. Click the OK button to close the window.
6.25 Detecting missing videos
Tartube can detect videos you have downloaded, but which have been since deleted by the original uploader.
Click Edit > System preferences... > Operations > Missing
(If advanced preferences are enabled, then instead click Edit > System preferences... > Operations > Preferences)
Click the button Add videos which have been removed from a channel/playlist to the Missing Videos folder to select it
Having enabled detection, removed videos will appear in the Missing Videos folder. To empty that folder, right-click it and select Folder contents > All contents > Mark as not missing.
Tartube only detects missing videos when checking/downloading whole channels or playlists. If you interrupt a download, no detection occurs.
6.26 More information about FFmpeg and AVConv
6.26.1 Using FFmpeg / AVConv with youtube-dl
If you explicitly set the location of the FFmpeg and/or AVConv executables, then those locations are passed on to youtube-dl when you check or download videos.
If both locations are set, only one of them is passed on. Usually, that's the location of FFmpeg. However, if you specify the --prefer-avconv download option, then AVConv is passed on, instead.
Click Edit > General download options...
In the new window, if the Show advanced download options button is visible, click it
Now click the Post-processing tab
Click the Prefer AVConv over FFmpeg button to select it
Make sure the Prefer FFmpeg over AVConv (default) button is not selected
Click OK to apply your changes
For more information about download options, see 6.12 Download options.
6.26.2 Using FFmpeg directly
You can process videos and thumbnails with FFmpeg directly, if you need to. This is useful for converting a file from one format to another, and for many other tasks.
Click a video, or select several videos together
Right-click the video(s) and select Special > Process with FFmpeg...
The FFmpeg options window opens
FFmpeg options behave much like download options.
You can click the Show more FFmpeg options to show advanced options
One set of FFmpeg options is the current one
If you want to switch to a different set, click Edit > System preferences... > Options > FFmpeg options
FFmpeg options are saved with the Tartube database; you can Export and Import them between databases
The box at the top allows you to add FFmpeg options directly. For example, to convert the framerate of some videos to 24 fps, add the following text:
-r 24
6.26.3 Using FFmpeg options
In the options windows, click the File tab.
Converting a video from one format to another is as simple as adding the text avi or mkv (or any other valid video format) to the box Change file extension,
The Videos tab contains an optional list of videos. These are the videos that are processed, when you click the Process files button in the bottom-right corner. (If the list is empty, you will see an OK button instead).
You can add videos to this list by dragging and dropping them. Dragging from an external application is allowed, if the videos are also visible somewhere in Tartube's main window (for example, in its database, or in the Classic Mode tab).
6.26.4 Advanced FFmpeg options
Now click the Name tab again. One box shows the FFmpeg system command that will be used to process the videos.
If you click the Show more FFmpeg options button, you'll notice that the system command changes radically, and that two new tabs have appeared. Go ahead and click the new Settings tab.
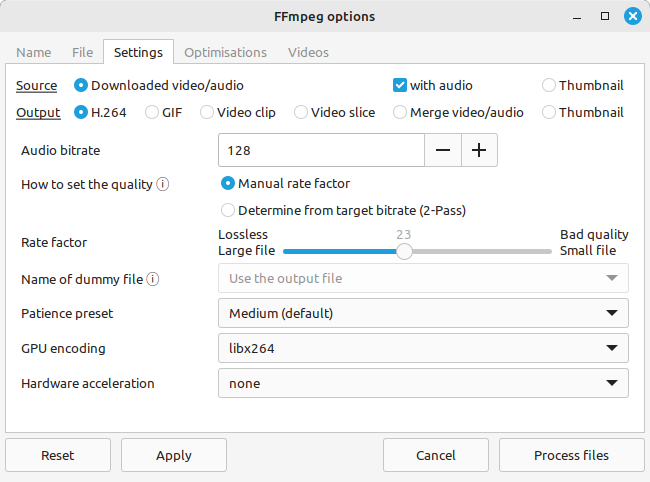
This tab defines a source file and an output file.
The source file can be a video, or a thumbnail. If you select Thumbnail, then FFmpeg will process the thumbnails associated with videos listed in the Videos tab; otherwise, it will process the video files themselves.
The Output setting defines whatever you're trying to achieve. If you want FFmpeg to produce a video, then H.264 is the most useful setting (but you could also choose GIF).
When youtube-dl downloads a video, it often downloads the video and audio components seperately. The two pieces are then merged by FFmpeg. Usually, all of this happens automatically, but if the merge didn't succeed (or wasn't attempted), you can try again by selecting Merge video/audio. This settings expects to find a video file and an audio file with the same name (but with different file extensions).
If the source file is a thumbnail, then the output file must also be a thumbnail.
6.27 Video clips
Tartube can create video clips by downloading parts of a video. It can also split up a video it has already downloaded. This functionality requires FFmpeg.
Tartube can extract a list of timestamps from a video's description. It can also extract the chapter list from a video's metadata (.info.json) file. If you prefer, you can specify your own timestamps. Using this data, you can create video clips of any length.
Both video clips and the original video are normally added to Tartube's database. Of course, if you create clips in the Classic Mode tab, then they won't be added to the database - see 6.27.3 Video clips in Classic Mode.
It's important to be aware of the limitations of this feature.
Downloading video clips might take longer than downloading the full video
Some video formats cannot be divided into clips accurately. .mp4 is much better than .webm. If you want to download video clips, we recommend downloading in .mp4 format
If you want clips that start and end at a particular frame, Tartube is not a suitable tool. Use a dedicated video editor instead
6.27.1 Video clip preferences
Before you start, take a look at Tartube's video clip preferences (click Edit > System preferences... > Operations > Clips).
It will save a lot of time if you let Tartube automatically extract timestamps, so most users should enable that
Video clips are stored in the Video Clips folder by default, but you can store them alongside the original video, if you prefer
Video clips can be added to Tartube's database, either alongside or instead of the original video
If you're going to make a lot of video clips, you can store them in a sub-folder (one for each original video)
If your database already contains a lot of videos, you can ask Tartube to extract timestamps from their descriptions or metadata.
Click Edit > System preferences > Files > Updates
Click the button Extract timestamps for all videos
If you prefer to update videos one at a time, right-click the video and select Show video > Properties... > Timestamps. Then click the button Reset list using video description.
6.27.2 Quick video clips
After checking or downloading a video, you can right-click it and select Special > Create video clips...
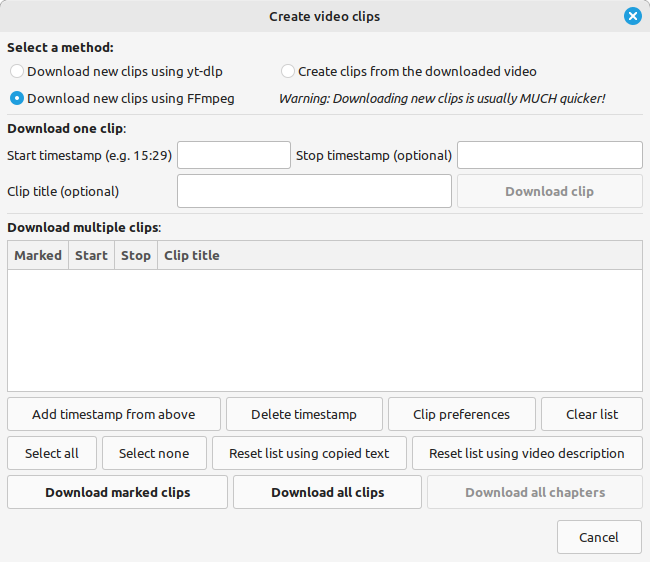
The new dialogue window contains a lot of buttons, but it's actually quite simple.
First, choose what you want to do
If you have already downloaded a video, you can select Create clips from the downloaded video. However, it is often quicker just to download the clips you want.
There are two options for downloading clips. For some users, downloading with yt-dlp might produce better results than downloading with FFmpeg, but you can use whichever method you prefer.
Creating a single clip
A timestamp is in the form 15:29, meaning 15 minutes and 29 seconds, or 1:15:29, meaning 1 hour, 15 minutes and 29 seconds.
Each video clip is represented by two timestamps: a start and a stop timestamp. The start timestamp is compulsory. The stop timestamp is optional; if it isn't specified, then the video clip will end at the beginning of the next video clip (or at the end of the video, if there are no more.)
If you already know the start and stop timestamps for your clip, you can use this Download one clip / Create one clip section. Enter the timestamps, enter a clip title, and then click the Download clip / Create clip button. The procedure will begin immediately.
Creating multiple clips
When you use the Download one clip / Create one clip section, the timestamps are forgotten as soon as the procedure is finished. In the section below, any timestamps you add are stored in Tartube's database permanently. (You can see them by right-clicking a video and selecting Show video > Properties... > Timestamps).
If you don't already see a list of timestamps in the window, you can click the Reset list using video description button. If this doesn't work, you will have to add the timestamps yourself.
When you're ready, you can click one of the buttons at the bottom of the window.
Download all clips / Create all clips will use all of the clips in the list. Download marked clips / Create marked clips will use only the clips you have marked. To mark a clip, select the small button on the left edge of the row.
Download all chapters is only available when you have selected Download new clips using yt-dlp. It uses yt-dlp's built-in ability to download separate video chapters; the timestamps in the list above are ignored.
6.27.3 Video clips in Classic Mode
As mentioned above, video clips created in the Classic Mode tab are not added to Tartube's database.
To download video clips, click the Add video clips button. The dialogue window is similar to the one described above, but you will have to add the original video's URL. (Make sure you use the URL for a single video, not one for a channel or a playlist.)
It's a good idea to add a name for the original video, too; this will help to prevent duplicate file names.
When you click one of the Download buttons, the dialogue window disappears, and a line is added to the list at the bottom of the tab. Set up more downloads, if you like; when you've finished, click the Download all button.
If you want to create video clips from a video you've already downloaded, or if you want to download new clips without re-entering the URL, you can right-click the same line and select Create video clips...
6.27.4 Frequent video clip downloads
If you frequently create video clips, then you should set up custom downloads (see 6.14 Custom downloads).
Open the window for your preferred custom download. For example, click Edit > System preferences... > Operations > Custom, click general to select it, and click the Edit button
Click Download each video independently of its channel or playlist to select it
Now click the Clips tab
You can now select Split videos into video clips using timestamps (requires FFmpeg)
Click OK to close the window
The next step is to check any videos, channels and playlists (for example by clicking the big Check all button in the Videos tab).
This will fetch information about the videos. In many cases, a video's description will include a list of timestamps, and in other cases the video's metadata will include a list of chapters. Assuming that you enabled the auto-extract settings (as described above), that information will have been extracted. If not, you can enter some timestamps manually: right-click a video, and select Show video > Properties > Timestamps.
When you're ready, perform a custom download in the normal way (for example, by clicking Operations > Custom download all). Videos will be downloaded as a series of video clips. (If no timestamps have been specified, then the video is downloaded whole.)
Don't forget that custom downloads can be enabled in the Classic Mode tab, if you need them. Before downloading, click the menu button in the top-right corner of the tab, and select Enable custom downloads.
6.27.5 Extracting video clips
There is an alternative way of splitting into clips a video you've already downloaded. This method allows advanced users to customise FFmpeg's behaviour during the splitting process.
Right click the video, and select Special > Process with FFmpeg...
If the Clips tab is visible, click it
Otherwise, the Settings tab will be visible. Click it, then in the Output line, select Video clip
You can split a video using the timestamps already extracted. In the Clips tab (if visible), you can select Split videos using these timestamps to specify your own timestamps. The second method is useful if FFmpeg is acting on multiple videos at the same time.
When you're ready to go, click the Process files button.
6.28 Video slices
Unwanted parts of a video, such as adverts and intro/outro music, are called video slices.
Tartube can download a video with the slices removed. It can also remove slices from a video you have already downloaded. This functionality requires FFmpeg.
Tartube contacts a SponsorBlock server to get a list of video slices. Not all videos have been added to the SponsorBlock database, so you can also specify your own slices when necessary.
It's important to be aware of the limitations of this feature.
Downloading and slicing a video might take longer than a normal download. In some cases, it might be quicker just to skip over (or watch!) the adverts
Some video formats cannot be sliced accurately. .mp4 is much better than .webm. If you want to remove slices, we recommend downloading videos in .mp4 format
If you want to remove slices starting and ending at a particular frame, Tartube is not a suitable tool. Use a dedicated video editor instead
6.28.1 Video slice preferences
Before you start, take a look at Tartube's video slice preferences (click Edit > System preferences... > Operations > Slices).
It will save a lot of time if you let Tartube contact SponsorBlock automatically, every time a video is checked or downloaded
Obfuscating the video's ID is recommended to protect your privacy. SponsorBlock will not know for sure which video you're looking for, so it will send data for a range of videos; Tartube will ignore the extra data
If you want to update a video, you can right-click it and select Check video, which will update the video and contact SponsorBlock for a second time.
6.28.2 Quick video slices
After checking or downloading a video, you can right-click it and then select Special > Remove video slices...
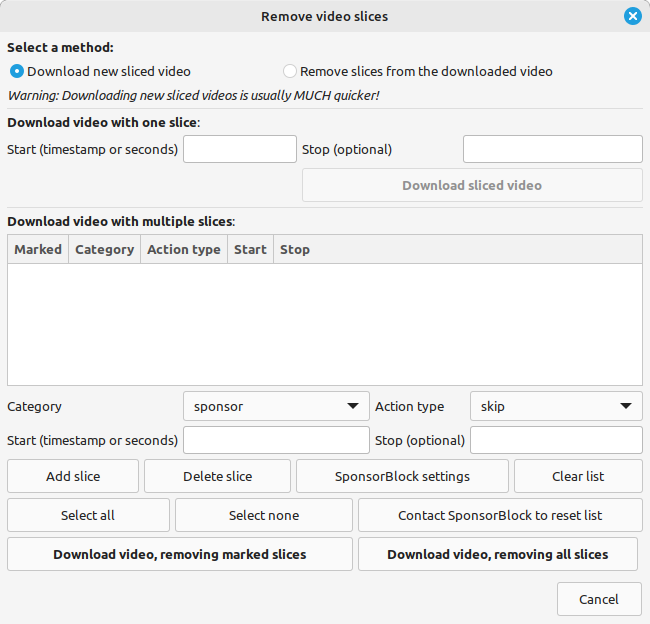
The new dialogue window contains a lot of buttons, but it's actually quite simple.
First, choose what you want to do
If you have already downloaded a video, you can select Remove slices from the downloaded video. However, it is sometimes quicker just to download the a new copy of the video with the slices removed, in which case, you should select Download new sliced video.
Removing a single slice
A timestamp is in the form 15:29, meaning 15 minutes and 29 seconds, or 1:15:29, meaning 1 hour, 15 minutes and 29 seconds.
Each video slice is represented by two values: a start and a stop value. You can use a timestamp, or a value in seconds. The start value is compulsory. The stop value is optional; if it isn't specified, then the video slice will end at the beginning of the next video slice (or at the end of the video, if there are no more.)
If you already know the start and stop values for your slice, you can use this Download sliced video / Create sliced video section. Enter the values and then click the Download sliced video / Create sliced video button. The procedure will begin immediately.
Removing multiple slices
When you use the Download video with one slice / Create video with one slice section, the time values are forgotten as soon as the procedure is finished. In the section below, any time values you add are stored in Tartube's database permanently. (You can see them by right-clicking a video and selecting Show video > Properties... > Slices).
If you don't already see a list of time values in the window, you can click the Contact SponsorBlock to reset list button. If this doesn't work, you will have to add the time values yourself.
SponsorBlock categorises video slices, distinguishing between (for example) adverts and intro music. In this window, it is not necessary to choose a category before clicking the Add slice button, since you'll be choosing for yourself which slices to remove.
When you're ready, you can click one of the buttons at the bottom of the window.
Download video, removing all slices / Create video, removing all slices will use all of the slices in the list. Download video, removing marked slices / Create video, removing marked slices will use only the slices you have marked. To mark a slice, select the small button on the left edge of the row.
6.28.3 Video slices in Classic Mode
As mentioned above, sliced videos created in the Classic Mode tab are not added to Tartube's database.
Removing video slices in the Classic Mode tab is very simple; it is essentially an on/off setting. To enable it, select the Use SponsorBlock button.
This setting will not work at all unless you are using yt-dlp, and at least FFmpeg v5.1+. (Note that, at the time of writing, many users will have an older version of FFmpeg installed on their system.)
6.28.4 Frequent sliced video downloads
If you frequently remove slices from videos, then you should set up custom downloads (see 6.14 Custom downloads).
Open the window for your preferred custom download. For example, click Edit > System preferences... > Operations > Custom, click general to select it, and click the Edit button
In the new window, click Download each video independently of its channel or playlist to select it
Now click the Slices tab
You can now select Remove slices from the video using SponsorBlock data
Select which types of slice you want to remove by clicking the small box on the left edge of each row
When you're ready, click OK to close the window
The next step is to check any videos, channels and playlists (for example by clicking the Check all button in the Videos tab).
This will fetch information about the videos. Assuming that you allowed Tartube to contact SponsorBlock automatically (as described above), some of those videos will now have a red icon next to them, indicating that a list of slices has been obtained. If not, you can enter some slices manually: right-click a video, and select Show video > Properties > Slices.
Each video slice is represented by four properties:
The start and stop times, in seconds or expressed as timestamps
The stop time is optional. If you don't specify it, the end of the video is used
Category is the type of slice; for example, a sponsor slice is an advert
At the moment, there is only one Action type available: skip means to remove the slice from the video
When you're ready, perform a custom download in the normal way (for example, by clicking Operations > Custom download all). Tartube will download the video as a sequence of video clips, before concatenating (joining) them together into a single video. (If no slices have been specified, then the video is downloaded whole.)
Don't forget that custom downloads can be enabled in the Classic Mode tab, if you need them. Before downloading, click the menu button in the top-right corner of the tab, and select Enable custom downloads.
6.28.5 Extracting video slices
There is an alternative way of removing slices from a video you've already downloaded. This method allows advanced users to customise FFmpeg's behaviour during the slicing process.
Right click the video, and select Special > Process with FFmpeg...
If the Slices tab is visible, click it
Otherwise, the Settings tab will be visible. Click it, then in the Output line, select Video slice
You can slice a video using SponsorBlock data already obtained. In the Slices tab (if visible), you can select Use this slice data to specify your own video slices. The second option is useful if FFmpeg is acting on multiple videos at the same time.
When you're ready to go, click the Process files button.
6.29 Using youtube-dl forks
youtube-dl is open-source software, and there are a number of forks available. Tartube officially supports both the original version and yt-dlp.
If a youtube-dl fork is still compatible with the original, then Tartube can use it instead of the original.
Click Edit > System preferences... > Downloaders > Forks
In the box Other forks, enter the name of the fork
Click OK to close the preferences window
Now click Operations > Update <fork>, which will download (or update) the fork on your system
6.30 Video comments
yt-dlp can retrieve a video's comments (youtube-dl cannot, currently).
The comments are written to the video's metadata (.info.json) file. Tartube can also store a copy of the comments in its database.
Fetching comments will increase the length of a download, perhaps by a lot. Adding comments to Tartube's database may increase its size dramatically, meaning that on startup, the database takes much longer to load.
This is how to enable comment fetching.
Click Edit > System preferences... > Downloaders > Forks, and make sure yt-dlp is selected
Click the OK button to close that window
Now click Edit > General download options...
If the Show advanced download options button is visible, click it
Now click the Downloads > Comments tab
Select When checking videos, store comments in the metadata file
You can also select When downloading videos, store comments in the metadata file
You can also select Also store comments in the Tartube database
By default, the metadata file isn't kept permanently. If you want a permanent archive of video comments, you should do this:
Click Edit > General download options... > Files > Write/move
Make sure Write video's metadata to an .info.json file is selected
Now click the tab Keep
Make sure the two Keep the metadata file buttons are selected
Comments can be loaded from the metadata file into the Tartube database at any time.
Right-click a video, and select Show video > Properties... > Comments
If the metadata file exists, you can click the button Update from the metadata file
Alternatively, you can update the entire database at once. (This may take a long time.)
Click Edit > System preferences... > Files > Update
Click the button Extract comments for all videos
6.31 Dark themes on MS Windows
On Linux and MacOS, Tartube will automatically assume the desktop theme (whatever it is). That isn't technically possible on MS Windows, but if you want a darker window to match your darker desktop theme, do this:
Click System > Change theme...
In the new window's drop-down box, select dark, and click the OK button
Restart Tartube to apply the darker theme
If you really want to, it's possible to add more themes to the small selection included in the MS Windows installer.
First, select a suitable theme pack. Tartube's installer includes this one. Let's imagine a future installer that doesn't include that particular theme pack; this is how you would add it.
Locate Tartube's script folder. In Tartube's menu, click System > Show Tartube script folder
Navigate to the \pack\mswin_themes folder
Each of these folders specifies the name of a theme. Create a new folder called dark
Inside that folder, create a file called settings.ini
Open the file in a text editor, and add these lines:
[Settings]
gtk-theme-name=Windows10
Note that Windows10 is the name of the theme pack, not the name of your operating system.
Re-start Tartube
Click System > Change theme...
Your dark should be visible in the drop-down box
Now you must install the theme pack itself at the correct location.
Download the theme pack from the link above
Extract it, and navigate to the gtk-3.20 folder. The files inside this folder are the ones you need to copy
Next, in Tartube's menu, click System > Show Tartube install folder
In the new window, navigate to msys64\mingw64\share\themes
Create a folder called Windows10, matching the theme pack's name
Inside that folder, create a folder called gtk-3.0
Copy the files from the theme pack's gtk-3.20 folder into this new gtk-3.0 folder
You can now set the theme from Tartube's menu.
7 Frequently-Asked Questions
7.1 Tartube won't install/won't run/doesn't work
Q: I can't install Tartube / I can't run Tartube / Tartube doesn't work properly!
A: See 7.24 Doesn't work on 32-bit Windows / Windows 7 / Windows 8
A: See also 7.2 Update Tartube on MS Windows
A: On Linux, if the DEB or RPM package doesn't work, try installing via PyPI: 5.3.5 Install using PyPI
A: Please report any problems to the authors at our Github page.
As of v2.4.108, most system errors should be visible in Tartube's main window (in the Errors/Warnings tab). If not, it may be necessary to run Tartube from inside a terminal window in order to see the errors
On MS Windows, this is how to run Tartube from inside a terminal window:
In Tartube's main menu, select System > Show Tartube install folder
After the folder window opens, shut down Tartube
In the folder window, click the msys64 folder to open it
(For users of Tartube's portable edition, the corresponding folder is called tartube)
Open the terminal by double-clicking mingw64.exe
In this window, type these commands to start Tartube (paying attention to the forward slashes):
cd /home/user/tartube
python3 -X utf8 tartube/tartube
7.2 Update Tartube on MS Windows
Q: You told me I need to update my Windows installation, how do I do that?
A: New installers for MS Windows are not released frequently, but small updates and fixes are uploaded frequently to Github. You can update your Tartube installation quite easily.
Download the latest source code from Github
In Tartube's main menu, select System > Show Tartube script folder
A folder opens containing files such as setup.py and README.html
Copy the downloaded source code into this folder, replacing old files with new ones
Restart Tartube
7.3 "Download did not start" error
Q: When I try to download videos, nothing happens! In the Errors/Warnings tab, I can see "Download did not start"!
7.4 Can't download a video
Q: I can't download the video!
A: Make sure youtube-dl is updated; see 6.2 Updating the downloader
Before submitting a bug report, find out whether Tartube is responsible for the problem, or not. You can do this by opening a terminal window, and typing something like this:
youtube-dl <url>
...where <url> is the address of the video. If the video downloads successfully, then it's a Tartube problem that you can report. If it doesn't download, you should submit a bug report to the authors of the downloader instead. (You could also try a different downloader.)
Because most people don't like typing, Tartube offers a shortcut.
Click Operations > Test youtube-dl, or right-click a video, and select Downloads > Test system command
In the dialogue window, enter the link (URL) to the video
You can add more youtube-dl download options, if you want. See here for a complete list of them
Click the OK button to close the window and begin the test
Click the Output tab to watch the test as it progresses
When the test is finished, a temporary directory (folder) opens, containing anything that youtube-dl was able to download
7.5 Downloads never finish
Q: I clicked the 'Download all' button and it starts, but never finishes!
A: This generally indicates an error in the Python, Gtk and/or Tartube code. The error should be visible in the Errors/Warnings tab. See 7.1 Tartube won't install/won't run/doesn't work).
7.6 Videos are missing after a crash
Q: After I downloaded some videos, Tartube crashed, and now all my videos are missing!
A: Tartube creates a backup copy of its database, before trying to save a new copy. In the unlikely event of a failure, you can replace the broken database file with the backup file.
Open the data directory (folder). If you're not sure where to find Tartube's data directory, you can click Edit > System preferences... > Files > Database
Make sure Tartube is not running. The Tartube window is sometimes minimised, and sometimes only visible in the system tray
In the data directory is the broken tartube.db file. You should rename to something else, in case you want to examine it later
In the same directory, you might be able to see a directory called .backups
If .backups is not visible, then it is hidden. (On many Linux and BSD systems, pressing CTRL + H will reveal hidden directories)
Inside the .backups directory, you'll find some backup copies of the database file
Choose the most recent one, copy it into the directory above, and rename the copy as tartube.db, replacing the old broken file
Restart Tartube
Click the Check All button. Tartube will update its database with any videos you've downloaded that were not in the backup database file
Tartube can make more frequent backups of your database file, if you want. See the options in Edit > System preferences... > Files > Backups.
Note that Tartube does not create backup copies of the videos you've downloaded. That is your responsibility!
7.7 Tartube database is broken
Q: The Tartube database is totally broken! How do I rebuild it? I don't want to download everything again!
A: If Tartube is able to load the database at all, then there is a built-in database repair tool. Click File > Check database integrity
A: Try loading one of the database backups - see 7.6 Videos are missing after a crash
A: If the database file (tartube.db) is not actually corrupted, you can extract a list of channels and playlists from it. The list is exported as a JSON file.
To create the export, click File > Database preferences > Dump database to JSON.
The export can then be re-imported into your current database in the normal way (see 6.21.4 Exporting/importing the database).
A: Earlier versions of Tartube did in fact introduce occasional blips into the database. It's possible (though unlikely) that some blips still exist, despite the best efforts of the authors. If you really want to rebuild the database from scratch, this is how to do it.
Firstly, click Media > Export/import > Export from database....
In the dialogue window, it's not necessary to select the button Include lists of videos. Click the OK button. Let Tartube create the backup file. You now have a backup of the names and URLs for every channel/playlist you've added.
Next, shut down Tartube.
Tartube's data folder contains the database file, tartube.db. Rename it (don't delete it).
Now you can restart Tartube. Tartube will create a brand new database file.
Click Media > Export/import > Import into database... and select the file you created moments ago.
All the channels/playlists should now be visible in the main window. Click the Check All button in the bottom-left corner and wait for it to finish.
Your new database now contains information about all the videos, but it doesn't know that most of those videos have been downloaded already. Click Operations > Refresh database... to take care of that.
A: Database files created by Tartube v1.1.0 and earlier cannot be loaded due to serialisation issues. There is possibly no way to fix this.
7.10 Channel downloads one video at a time
Q: In the Progress tab, 'Max downloads' is set to 2. But when I download my favourite channel, it downloads only one video at a time!
When you add a channel (or a playlist), Tartube knows the URL of the channel, but it doesn't know anything about the videos inside it. Therefore it passes the URL of the channel to youtube-dl. Therefore the channel is downloaded, one video at a time.
You can download multiple videos from the same channel simultaneously, if you want (but it probably won't speed up your overall download).
Right-click the channel and select Check channel
When the operation finishes, Tartube will know the URL of each video
In the list of videos, select every video (press CTRL + A)
Right-click one of the videos, and select Download videos
Alternatively, you can use custom downloads (see 6.14 Custom downloads).
7.11 Tartube database file is getting in the way
Q: Tartube stores its database file in the same place as its videos. Why can't I store them in different places?
A: This question has been asked by several people who were storing their videos on some remote filesystem (perhaps in the so-called 'cloud'). They found that the videos could be downloaded to that remote location, but that Tartube couldn't save its database file there.
At the moment, the answer is 'Tartube is working fine, fix your own computer'. Perhaps in the future, someone will think of an urgent need for the database file and the data folder to be split up. Until then, there are a number of good reasons for keeping them together:
If the database file exists in the folder, Tartube can be confident that it's downloading videos to the place you actually intended
If Tartube can't read/write its own database file, that probably means that it won't be possible to store any videos, thumbnails, descriptions, and so on
Tartube actually creates a number of temporary files at this location, most of which are invisible but need to be in the same place as the videos
If you want to move your videos from one location to another, it's easy - just move a single directory (folder) and everything it contains. There is no need to reconfigure anything; just tell Tartube where to find the new directory (folder)
Splitting up the data folder and the database file would require a lot of code to be rewritten, and this would probably introduce lots of new bugs
7.12 Duplicate video names
Q: I downloaded a channel, but some of the videos in the channel have the same name. Tartube only downloads one of them!
A: Tartube can create files with names in different formats. The name of two videos might be identical, but each video will have a unique ID, so you can add the ID to the filename.
Click Edit > General download options... > Files > File names
In the box Format for video file names, select Title + ID
Click OK to close the window
7.13 Convert video to audio
Q: I want to convert the video files to audio files!
A: See 6.22 Converting to audio
7.14 Video is downloaded as separate video/audio files
Q: I downloaded a video and expected a single video file, instead Tartube downloaded several files, none of which are playable!
Q: I set the download option 'If a merge is required after post-processing, output to this format', but it doesn't work!
A: The solution to both problems is to install FFmpeg, and to set the output format correctly.
Firstly, make sure FFmpeg is installed on your system - see 6.4 Installing FFmpeg / AVConv.
Secondly, set your desired output format. Open the Download options window (for example, click Edit > General download options... > Formats). Add a format like mp4 to the List of preferred formats, then add the same format to If a merge is required after post-processing, output to this format.
For some reason, youtube-dl ignores the download option unless the format is specified in both places. (You will see a warning if you forget.)
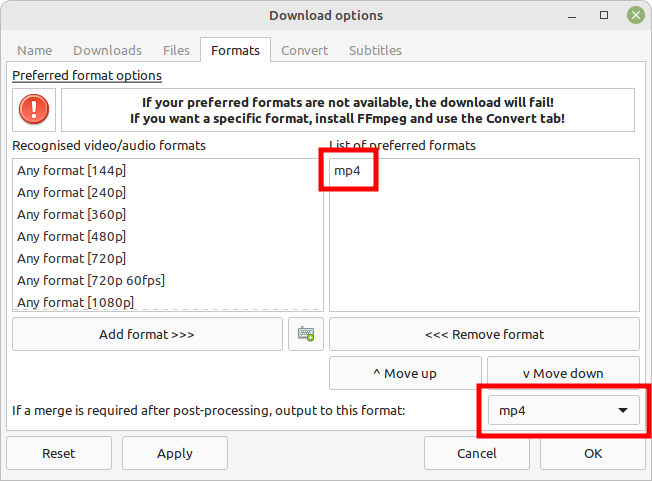
Tartube can merge a video and audio file together, long after they have been downloaded - see 6.26 More information about FFmpeg and AVConv.
7.15 Too many folders in the main window
Q: The main window is full of folders I never use! I can't see my own channels, playlists and folders!
A: In the main window's toolbar, click the Hide (most) system folders button (a red folder)
A: In the main menu, click Media > Show/hide > Hide (most) system folders
A: Right-click the folders you don't want to see, and select Folder actions > Hide folder. To reverse this step, in the main menu click Media > Show/hide > Show hidden folders
A: In the main menu, click Edit > System preferences... > Windows > Videos, and click Show smaller icons to select it
A: If you have many channels and playlists, create a folder, and then drag-and-drop some channels/playlists into it
7.16 Not enough videos in the main window
Q: I want to see all the videos on a single page, not spread over several pages!
A: In the toolbar at the bottom of the Videos tab, set the page size to zero, and press ENTER.
7.17 Toolbar is too small
Q: The toolbar is too small! There isn't enough room for all the buttons!
A: Click Edit > System preferences... > Windows > Main window and then click Don't show labels in the main window toolbar to select it.
MS Windows users can already see a toolbar without labels.
7.18 Toolbar is too big
Q: The toolbar is too big! Make it go away!
A: Click Edit > System preferences... > Windows > Main window, and then click Don't show the main window toolbar. The new setting is applied when you restart Tartube.
7.19 YouTube name/password not accepted
Q: I added my YouTube username and password, but I am still seeing authentification errors!
A: The questioner is talking about the settings in Edit > General download options... > Advanced > Authentication.
This is a youtube-dl issue. A general solution is described in this post.
The solution describes how to create a cookies.txt file, which can be specified as a download option.
Having created the file, in the same edit window, click the Name tab. In the box labelled Additional download options, you can add:
--cookies=YT-cookies.txt
See also the Tartube thread here.
7.20 Georestriction workarounds don't work
Q: I want to download a video, but it's blocked in my region. I set the geostriction workarounds, but I still can't download the video!
A: youtube-dl provides some options for bypassing region-blocking. To show them, click Edit > General download options...
Click the Show advanced download options button if it's visible, then click the tabs Advanced > Geo-restriction.
Unfortunately, although these options exist, websites are not compelled to respect them. YouTube, in particular, may completely ignore them.
In many cases, the only remedy is to buy a subscription to a VPN (or to the video website itself).
7.21 Video website blocks me
Q: I downloaded some videos from a channel, but then YouTube blocked me, and I can't download the rest of them!
A: Change your IP address and try again.
A: Subscribe to a VPN.
A: You can specify a list of proxies (Edit > System preferences... > Operations > Proxies). During a download operation, Tartube will cycle between these proxies.
Unfortunately, it is not possible to switch between proxies while downloading a channel (youtube-dl does not offer that functionality). But the proxy list will work well if you're trying to download ten different channels.
7.22 Too many blocked videos
Q: The Videos tab is full of 'blocked' videos!
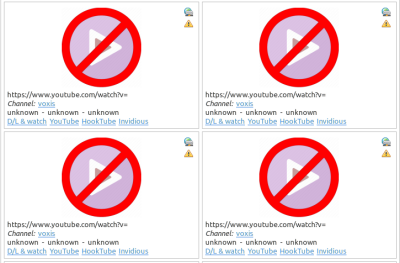
A: If Tartube detects a video that has been age-restricted, censored or otherwise blocked, it is still added to the database. Unfortunately, Tartube doesn't know anything about the video, not even when it was uploaded, so videos like this appear at the top of the list.
If you don't want to see blocked videos in the Videos tab, deselect the button in the toolbar. (If you're not sure how to use the toolbar, see see 6.16 Filtering and finding videos.)
If you don't want the blocked videos added to your database at all, you can click Edit > System preferences > Operations > Downloads, and then de-select Add censored, age-restricted and other blocked videos to the database
7.23 MS Windows installer is too big
Q: Why is the Windows installer so big?
A: Tartube is a Linux application. The installer for MS Windows contains not just Tartube itself, but a copy of Python and a whole bunch of essential graphics libraries, all of them ported to MS Windows.
Installing FFmpeg will dramatically increase the size of the installed folder.
If you're at all suspicious that such a small application uses such a large installer, you are invited to examine the installed files for yourself:
In Tartube's main menu, select System > Show Tartube install folder
Everything is copied into this single folder. The installer doesn't modify the Windows registry, nor does it install files anywhere else (other than to the desktop and the Start Menu).
The NSIS scripts used to create the installers can be found here:
In Tartube's main menu, select System > Show Tartube script folder
Click the nsis folder to open it
The scripts contain full instructions, so you should be able to create your own installer and then compare it to the official one.
7.24 Doesn't work on 32-bit Windows / Windows 7 / Windows 8
Q: Tartube does not install/work on my ancient computer!
A: MSYS2 has dropped support for older Windows systems. As of November 2023, the minimum requirement is 64bit Windows 8.1 / Windows Server 2012 R2.
Tartube cannot be run on any 32-bit Windows system.
Tartube can be run on Windows 7 and Windows 8, but you will need to use an older installer.
After running the installer, you can manually update Tartube to the most recent version, as described here: 7.2 Update Tartube on MS Windows.
7.25 Tartube can't detect livestreams
Q: Tartube can't detect upcoming livestreams at all!
A: Click Edit > System preferences... General > Modules.
If the Python feedparser module is not available, you can install it via PyPI. On Linux/BSD, the command to use is something like:
pip3 install feedparser
The Tartube installer for 64-bit MS Windows already contains a copy of feedparser, so there is no need to install it again.
7.26 Livestream is already finished
Q: Tartube is showing a livestream that finished hours/days/centuries ago!
A: Right-click the video and select Livestream > Not a livestream.
7.27 Can't hear livestream alarms
Q: I set an alarm for an upcoming livestream, but I didn't hear anything!
A: Obviously you have already checked that your speakers are turned on, so now click Edit > System preferences... > General > Modules.
If the Python playsound3 module is not available, you can install it via PyPI. On Linux/BSD, the command to use is something like:
pip3 install playsound3
The Tartube installer for 64-bit MS Windows already contains a copy of playsound3, so there is no need to install it again.
7.28 Some icons not visible
Q: Icons in the Videos tab are broken! They all look the same!
Q: Icons in the Classic Mode tab are broken! They all look the same!
A: Since v2.4, Tartube uses a set of custom icons, replacing system (stock) icons. This was because some users were complaining that their (broken) systems didn't provide the stock icons.
If you want to restore stock icons, click Edit > System preferences... > Windows > Main window and then click Replace stock icons with custom icons (in case stock icons are not visible) to deselect it. Click the OK button to close the window, then restart Tartube.
7.29 Video thumbnails not visible
Q: Tartube doesn't download video thumbnails any more! It used to work fine!
A: In June 2020, YouTube changed its image format from .jpg to .webp. Unfortunately, most software (including the graphics libraries used by Tartube) don't support .webp images yet. Worse still, YouTube begain sending .webp thumbnails mislabelled as .jpg files.
In September 2020, Tartube and youtube-dl added separate fixes for this problem. These fixes both depend on FFmpeg, so they won't work if FFmpeg is not installed on your system - see 6.4 Installing FFmpeg / AVConv.
If you have already downloaded a lot of .webp images, you can ask Tartube to convert them back to .jpg. Once converted, they will be visible in the main window.
Click Operations > Tidy up files...
In the dialogue window, click Convert .webp files to .jpg using FFmpeg to select it, then click the OK button
7.30 Video text not visible
Q: I can't see the text below each video!
A: If the background colours in the Videos and Drag and Drop tabs are getting in the way, you can change them: click Edit > Sysem preferences... > Windows > Colours.
7.31 Graphs not visible
Q: My buddy installed Tartube, and he showed me some download history graphs. But when I looked for that on my computer, I couldn't find them!
A: Tartube shows download statistics in a number of places, for example Edit > System preferences... > Files > History.
The graphs are created by matplotlib, but none of the Tartube installers include it (because it's quite a large download). If you want graphs, you have to install matplotlib yourself.
On Linux/BSD, use your system's software manager.
On MS Windows, click Operations > Install matplotlib...
7.32 Tartube is not visible in the system tray
Q: Tartube is not visible in the system tray! There is just an empty space where the Tartube icon should be!
A: This problem exists on certain Linux desktop environments (e.g. Cinnamon) which have still not fixed an ancient bug. The bug is related to a message you might be able to see in a terminal window:
gdk_window_thaw_toplevel_updates: assertion 'window->update_and_descendants_freeze_count > 0' failed.
Other desktop environments (e.g. MATE) display the Tartube icon correctly.
7.33 Tartube is not portable
Q: I want to install Tartube on a USB stick. How do I make Tartube portable?
A: On MS Windows, download the portable edition rather than the usual installer - see 5.1 Installation - MS Windows.
A: On other operating systems, just download the source code and run it. Installation is not necessary (as long as you have installed the correct dependencies) - see 5.3.10 Run without installing.
Tartube looks for a configuration file in two places: firstly, the directory (folder) containing the source code (the one that contains a setup.py file), and then, the default location for the system.
If it doesn't find a configuration file in either location, it creates one in the default location for your system.
However, you can create an empty settings.json file in the source code directory. If Tartube sees that empty file, it starts writing config files to that location, rather than to the default location. The source code directory is now truly portable, since when you move it somewhere, its configuration file moves with it.
You can see both locations by clicking Edit > System preferences... > Files > Config.
7.34 Run out of disk space
Q: When I try to download videos, Tartube refuses, complaining "You have only X / Y Mb remaining on your device". But I'm using an external hard drive with over a trillion terabytes of empty space!
A: Some users have reported that, when using a virtual machine (e.g. VirtualBox), and when downloading videos to a separate filesystem (e.g. an external hard drive), Tartube checks the size of the virtual filesystem instead of the external drive.
This seems to be an issue with the virtualisation software itself (we have confirmed that everything works as expected on a non-virtual system).
The only thing that can be done is to disable the checks and warnings altogether. Click Edit > System preferences > Files > Device, and deselect both Before checking/downloading videos, warn user if disk space is less than and Halt downloads if disk space is less than.
7.35 Cannot embed thumbnails in videos
Q: In download options, I enabled embedding thumbnails in my downloaded videos, but it doesn't work!
A: Make sure you have installed FFmpeg.
A: Make sure you have not disabled the setting to remove .webp thumbnails after converting them to another format. Open Edit > System preferences > Operations > Downloads. If Convert .webp thumbnails into .jpg thumbnails is enabled, then ...but don't delete the original thumbnails should also be enabled.
7.36 Cannot install FFmpeg
Q: I'm trying to install Tartube on MS Windows. When Tartube prompts me to install FFmpeg, the installation fails!*
A: The software library that makes FFmpeg available for download breaks frequently. The only solution is to wait for the library to be fixed (but please still report the problem to Tartube's authors in the usual way).
This issue only affects users on MS Windows.
7.37 Cannot install yt-dlp plugins
Q: I installed a yt-dlp plugin, but it doesn't work, and I can't download even a single video!
A: Since v2.5.145, Tartube uses a new configuration on MS Windows. (This problem doesn't affect other systems).
If you want to install additional python modules, you must do so in a terminal window inside the virtual environment (venv) that has been set up for you.
There are two ways to do it. The first way is the simplest:
In Tartube's menu, click System > Open MSYS2 terminal
The second way will also work:
In Tartube's menu, click System > Show Tartube install folder
Navigate to msys64 folder
Double-click the mingw64.exe application to open it
In the new terminal window, type the following command before installing anything:
source ~/ytdl-venv/bin/activate
7.38 Annoying messages after downloads
Q: Every time Tartube downloads videos, it shows an annoying dialogue window. Make it stop!
A: The dialogues can be disabled in Edit > System preferences > Operations > Actions > Don't notify the user at the end of an operation.
7.39 Can't download from YouTube any more
Q: I can't download YouTube any more! I always see an "n challenge solving failed" message!
A: yt-dlp now requires Deno in order to download YouTube videos. The Tartube installer for MS Windows already includes it; otherwise, you can install it yourself.
7.40 No puedo hablar inglés
Q: ¡No puedo usar Tartube porque no hablo inglés!
A: Necesitamos más traductores.
If you would like to contribute a translation of this project, please read this document.
Contributions can be made using Tartube's Weblate page, if that is convenient.
8 Contributing
Report a bug: Use the Github issues page
10 License
Tartube is licensed under the GNU Lesser General Public License v2.1.
✨🍰✨